Showing posts with label dye. Show all posts

Friday, 27 December 2019

Some sewing related pressies

Aren’t friends and family so thoughtful?

Some books, fabric and other sewing related things have come into my studio.
Not to mention the chocolate!

Note books and eco- dyeing materials
And notelets from a very good friend.

Thank you so very much everyone!

Friday, 17 November 2017

Experiment

Instead of pouring out the pickled red cabbage juice when the jar was finished, I kept it.
Then when i was getting tired of the vinegar smell in my room....hmmm.
I put in some scraps of silk habotai that had some marking from an indigo dip.
I nuked it for 2min.
Drained it and voila! fuchsia and purple

Then I put it in the washer on a rinse cycle. To be honest, almost everything I try for an experiment comes out that colour. So I didn't really need more! But it was silk, so I could work with that.
Result:the reddish part of the purple washed out leaving a light periwinkle blue! Yes, I like this.
In true life, you hardly see the indigo markings and the silk has a lovely sheen. But the camera picks up the darker greenish blue of the indigo.

I have saved the rest for more experimenting.
my understanding of the science: Natural dyes are mostly fugitive, meaning they will fade. If you use a mordant, it is more likely to last longer. Because the pickled cabbage juice had vinegar, the vinegar works well on the silk and it will (should) retain colour.

I like experiments that come out better than you thought it could.

Friday, 28 October 2016

Willow design work

How I work:
On the computer
- inspiration photos so I can remember stem colour, overall colour and then shapes of leaves.
Pinning to the dummy (or to the design wall or laying things out on a piece on my table) - In this case, in real life the strips look more green than the photo. I was trying to see if I could get away with just the one layer of sheer fabric which I showed you yesterday.
But no. Too much of the blue. And comparing it to the close up leaves in the inspiration photo on the right, the answer is definitely not.

Bits and pieces going on at the same time - String dyed and now drying to be used for the willow stems.
I had tarragon+tea mixture left from earlier in the year when I dyed silk for the Mere Edges piece. It has already dyed the plastic container yellow and it is time for it to stop hanging around in my studio.
So, I stirred it and the string went in. Nuked it in the microwave 4 min. and left to sit while tearing the strips above. Now it is drying on the radiator in the downstairs loo.

So, the next step will be to stitch a string down the middle of the synthetic organza strip with a pale green colour underneath. Then take a deep breath to be brave enough to begin cutting leaves. (!) With the soldering iron so the edges are sealed.

Monday, 19 September 2016

Doing something with this!

Very excited about it too. Finally some way to showcase this fabric.

But you have to wait til I have time to sort photos!

Monday, 11 April 2016

Experiments

Golds, greens and browns required.

Trying to get gold with an old pack of turmeric. I read about it somewhere.
Not exactly what I had in mind. It becomes more daffodil yellow. But perhaps I can develop it.


A little more experimenting.


Lovely patterns developing on the drop cloth.

If I can get these ideas to play together, they will be for the current CQ challenge.

Tuesday, 22 January 2013

Snow Dyeing

Since the snow has stayed a few days, I decided to have another go with snow dyeing. I put some failed fabric experiments into a few plastic boxes. (the original contents are in piles now!)

Then filled with snow and poured left over dyes on top. Now to wait and see!

while I was getting rid of dyes, I thought I would have another go at parfait dyeing.
A random choice of fabrics layered with dye.

For both of these experiments I have used dry fabrics this time. The dyes are old to start with and with the snow especially they don't need to be diluted further.

Cross fingers! Most of these weren't wonderful fabrics to start with, so maybe there will be an improvement.

Monday, 8 October 2012

Now is our Discontent made Glorious

Apologies, Mr. Shakespeare.

Remember the disappointing results of the parfait dyeing? Well, I took some of the pieces to see what would happen if you overdyed them with indigo.

And here, my dear friends are the Glorious results!
Okay, something is happening with the camera and the lounge light, but you can see it is soooo much better than pale orange and peach. The underneath colour is now more like a pinkyblue.

And these are some overdyed turquoise pieces. Believe me they are much better in person. But also I would have done ALL of the turquoise ones if I could have stitched them without damaging the tendon in my finger on my right hand. As it was the teacher (Janice Gunner) finished stitching the right one for me.

And here is the piece I showed you that had been dipped in my friend's vat.

A piece of white ramie and an overdyed blue linen

Some scrunched cotton lawn. In the end, I loved the scrunched look enough to just do more of it while the vat was there (we each had our own vat) and instead of damaging my hands further. I might have been able to stitch this, but was running out of time.

I am sooo trying the scrunch technique with other dyes. I have done scrunch in small containers. but Janice suggested scrunching then packing several of them in net bags which fruit is sold in.

I did some silk pieces too with varying results. But don't want to bore you with them all.

There are a couple pieces that knock you out with the result! Ha. But I am not showing them because I think they want to be something in their own right and so I want to wait til I am ready to work with them.

Sunday, 7 October 2012

Indigo-glimpses

Fabrics rinsed and in the wash.
I am soooo exhausted. I just fell in bed when I got home. I am heading back there soon!

Here are a few glimpses of the work.
Other student work out on the line to dry.

Some of mine drying indoors.

I was struggling with my hands so much that I got quite behind on the stitching. For many of these, I was stitching on some failed dye experiments I wanted to overdye with the indigo. Most of it was poplin and I really struggled to stitch it. So, I never did get mine outdoors. But, it dried this way overnight.


I knew I have troubles with grip nowdays with opening jars and the like, but I haven't had such a struggle with hand stitching before. I want to do more of this, but I will have to work with linen, muslin and silk so I can actually stitch it better.
So, it will be my signature, right? Everyone else can do cotton and I will do loose weaves.

Thursday, 13 September 2012

Cyanotype

As promised...a bit about the demo/talk by Barbara Gunter-Jones last Saturday.

Follow the link to see what sorts of things Barbara does with her Cyanotype print processes. Here she explains some of the results and effects. You can see she is holding one of the prints on fabric.

For the demo, Barbara had prepainted papers with the cyanotype solution - a combination of 2 chemicals that react to light. When first painted on, they look yellowish. They had a slight blueish cast already because she dried them and brought them with her. In theory, you should work in a darkened room...not a dark room, but enough to see what you are doing. The fabric/paper has to be dry before being exposed to the sun. She hangs hers in an understairs cupboard for this process.

What I liked about Barbara's process was the step where she clamped the treated paper or fabric into a clip frame, or a piece of MDF with a perspex cover. I have read about cyanotype prints before and was put off by the idea of trying to keep leaves, etc from blowing away in the wind or extra bits falling onto your print or shadows caused by pins creating unwanted additions to your composition. This seems to help keep better control. It also holds the foliage close to the surface so you get a sharper image. Barbara most often works with dried pressed foliage because it is flatter and therefore sharper. It is also easier to get a similar image on subsequent prints such as the type of prints she wanted when making up cushions and bolsters for selling in boutiques.

composed samples underglass - mine is on the right
Once the painted fabric or paper is clamped into the frame, the whole is placed outside in the sun.

my sample is on the right
Depending on the depth of blue you want, you can leave it a few minutes or 15 minutes. But also it depends on the time of year. In winter, it can take 1/2 hour for a light blue. This is because the chemicals react to UV rays, which are not as strong in the winter and early spring. There are other variables, too, but it is part of the charm of what you will get.

What happened in the sun was the opposite of what I thought it would do. I thought it would get more and more blue. But not so. It actually gets lighter and lighter grey.

some of the other samples being taken from the clip frame

my sample out of the frame with the composition removed

The next step is to put it into water. Soak about 15 min for the chemicals to leach out. This is where the colour change happens for the blue results.

Barbara's demo piece in the water - she used a very fine paper stencil to show us the fine detail which can be achieved.
Paper needs to just lay there in the water. You can swish it a bit, but you don't want the paper to break down. (This paper was thicker than your normal printing paper.) For fabric you want to rinse it somewhat after it has soaked some. (Use gloves) The thicker the fabric, the longer it takes to rinse out. You can tell if the chemicals are still there, as the 'white' parts are still yellowish.

some of the varied samples - feathers can give real detailed prints of the edges.
When it is rinsed clear, you can see your print! Leave to dry and then use as desired...for fabric or paper collage or in your work in some way.

my piece
DO NOT clean the final piece with soap or detergent as it will destroy the print image. If you must clean, do infrequently by hand in water. Scarves can be dry cleaned, but Barbara has stopped doing them altogether because people forget - a year on they bung them in the wash on gentle, and then all the lovely work is destroyed.

I am now confident to get my little kit out of the drawer and have a go! (yes, I have a kit I purchased. It was one of those things I just had to see and hear about before I was confident to do.) I have some interesting ideas to try out following on from things mentioned on the day.

Edit: I have linked this to Off the Wall Friday at Nina-Marie's.

Thursday, 6 September 2012

parfait dyeing - or not

The idea from yesterday's photo teaser was to follow the parfait dyeing concept.

I used cotton and Dylon dyes. Rayna and Goodworks both thought it would look wonderful. So did I.

However, this was near the beginning of the summer around the time that we added a unplanned for trip to York because my MIL had a fall. So I didn't get back to the jar of dyes for about a week.

Tip of the week:
If you do parfait dyeing, don't leave it that long. They rather go all the same colour.

Which is why I have waited til now to show it.

So, I guess I will have to try overdyeing methods on these...some batik...some discharge...some flour resists...
some outright covering it up in hopes it gets better...

The above photo shows the fabrics folded to show the 'one' nearly redeemable bit of the fabrics. most of them nearly fit under the classification of Solids.

I keep forgetting that my ideas of what scarlet might do always disappoints. I just don't like it. It isn't red and it isn't orange. Just a poor attempt at inbetween. It doesn't even look good when you add more of one or the other to it. As I tried here.

Rayna might remember my attempts to redeem similar scarlet messes at her Master Class at FOQ a few years ago. I just have too much of these sorts of experiments with scarlet combinations. but, I think there are a lot of posts out there that show everyone always wins at these things. Well here is a post showing it isn't always the case.


Note to self...put unused scarlet into the box for the TVCT meeting on Sat. Put it on the "Been There, Done That" table. Someone else might like it.

Or not.

Wednesday, 5 September 2012

What About Wednesday?

Looks interesting?

I thought it might, too.
Results to follow...

Monday, 9 April 2012

Easter Weekend

Over the weekend we had several events on. A Good Friday Service, a Hot Cross Bun Event (like the Mince Pie event at Christmas) where the people from our church gave out balloons, hot cross buns and small Easter chocolate eggs. Just a chance to meet people from the community. And then the Sunday Services.

Since A Certain Young Man was here, I ended up doing alot more cooking. He went with my husband to the shops and rather than small tidy roasts, they came home with major beasts! So, we had Lamb on Saturday evening and Pork on Sunday. Then with the leftover lamb and being Bank Holiday Monday I made a lentil stew while we still had someone here to help eat it all.

At some point on Saturday I decided to see if I had any of the little food dye tablets left from a packet of Easter egg colouring someone sent me from America. As Someone had already eaten most of the eggs, and two out of the 5 left cracked in the pan, I ended up colouring 3 eggs. And since I didn't really want to waste the dye...I gathered up some silk scraps and put them in the cups!

Here is the tangle of silks after I put through a rinse in the machine. I was well impressed with the turquoise silk organza. It is interesting that the 'red' dye came out very fuchsia...the little piece of velvet is interesting. I don't think it is silk, maybe a rayon base. I have a plan for the green silk noil.

A Certain Young Man also had requested some alterations to some of his trousers/jeans...he has been weight training and suddenly things don't fit straight off the rack any more. I also took measurements for making a custom shirt for him. I am a bit nervous. He seems to want Saville Row quality at student prices. Yikes. but anyway, it will be a challenge.

Wednesday, 15 June 2011

Secret project

As I said, I finished the main part of Secret Project no.1 the other day. I am working on something to go with it, but it isn't crucial.

I deliberated quite a bit about Secret Project no.2, but finally settled on a design a few weeks ago. I had some natural coloured silk twill and a box of Dylon machine dyes I had hoped to change it with. I had already bought some lining; the nearest to what I could get to the blue on the box. However, when I opened the box ready to do it...well it said not to use it on silk. At that point it was do it or don't do it. So I did it anyway! I figured I was still open to the results to lead me for how I would develop the design so even if it had holes, I wouldn't mind.

Well, I am so glad I did it. I absolutly love the colour! It is almost a periwinkle blue and there is a subtle shine from the silk that catches your breath! and then to top it off, you could not get a better match for the lining if you tried. (the light is shining off the part next to the silk, but the darker section behind is more like the true colour. Well, I know people don't see the lining, but for me it makes me more confident if I have lining that isn't just making do.

And here is the amazing thing. Today I cut out the skirt, and the parts for the bodice and even started sewing things together. Some of the reason I managed to do so much today is because at least 3 filling up my head sorts of things are done now. It does help to focus if you have room in your head!

done things
-took down the TVCQ exhibition from the museum yesterday - done.
-5 out of 9 students submitted drafting folders which I marked and then the college internal verifier agreed with the marks. All 5 got distinctions for those units! - done
-a decision on major headachey issues over a particular matter with one of my group looks like it is going to turn out for the best. - done

I need to find out how to insert a tick. I love to tick things off a list, don't you?

Thursday, 20 May 2010

overdye results

So, I am not impressed with the results of my overdye attempt. especially the splotches of purple, which seems to be the only change. :-(

and the black paperlike fabric I want to use to over lay the piece to create the night scene is not quite big enough. :-(

and the place where I bought it has not got any more, nor are they carrying the product after they sell what they have. I have bought more of the types they did have for my stash, which was not part of the plan. :-(

And, I have spent all day filling in forms for my entry and EquilARTeral's entry for Reading Arts Week. (I hate forms). I also spent all day yesterday sorting plans for the Contemporary Coffee Morning I am to organise for FOQ. I do like to organise, I don't the process of writing out plans in such a way so as someone else can work out what I have in mind. (Perhaps, as is being currently discussed on the QA list, I need a manager...or at least a secretary. But you have to have some sort of income to pay one.) :-p

SO, I am doing diversionary things like cutting out the lining for the white jacket. :-) 
and playing mahjong titons on the computer. :-}

which means I have still not started the FOQ piece. :-O

But tomorrow is another day.

Wednesday, 19 May 2010

overdye results


Results of some of the overdyeing. The piece on the left was actually the green piece. the purple bits had actually been light grey...I used it for the Merdragon, but it was really to faint to use for much. the piece on the right is the scarlet piece. It is still not something I like, but maybe instead of trying more overdyeing, I will save it for the workshop I am taking at FOQ in August. Rayna Gillman suggests you can bring fabrics you are trying to redeem in some way, and we will be doing various surface design treatments to them.

As you can see, the fabrics don't have the spectacular results as the ones on the other blog I linked to. There are quite a few possible reasons for this, not the least of which is that I should really follow the directions at least once before I start adapting! LOL

The blue piece has been stuck back into the remants of dye that was left in the jar. I think I put too much fabric in. I think because it was in the centre of the scrunched fabric, there wasn't much happening to it.

Tuesday, 18 May 2010

Overdyeing

(Sorry for just words, Blogger doesn't want my photos today. I will try to edit this post tomorrow to put them in.) With photos!

I want to get started on one of my entries for the Festival Of Quilts this summer. I am needing a background that will work to create a night scene, and it needs to be a bit bigger than most of what I have on hand.

I had a look at the fabrics that resulted from the snowdyeing. One blue piece might work, but there are large light spaces on it. So, as I had to do a bit of running around today, I decided to overdye that piece.

I have been reading about something called parfait dyeing, which is basically a variation of low water immersion dyeing. Fabrics and dyes are alternately placed in a jar. In the versions I have seen, lighter dyes are at the bottom and darker at the top. The dyes at the top seep through and touch portions of the lower fabrics. It is pretty amazing.

So, I thought that might work for this fabric. However, as it is already blue, I really only want to add darker portions. So, I have layered with blue, black and purple dye. (left from another project) To fill the jar and get the tight crumples which will give the best patterning, I also added the green piece and the scarlet piece. They both need a bit of dimension to them to make them a bit more exciting.


So, here is the test...blue dye, green fabric, black dye, blue fabric,rest of blue dye and black dye, scarlet fabric, purple and black dye.
Looking forward to see what will happen tomorrow!

Sunday, 31 January 2010

Dylon Dyes

A few weeks ago when I was trying the snowdyeing lark, I received an email from Emma Forbes at Dylon Dyes. They had come across the blog due to my use of Dylon Dyes. Emma offered to send a selection of samples for me to work with!

And so, they arrived in the post on Saturday. Thank you very much! There machine dyes and a range of hand dyes. Joy of joys! The hand dyes are colours I love to use! It is a little confusing because they are called by names like tulip red...will that be the cherry red or the scarlet? I am thinking scarlet.
others are Intense Violet, Ocean Blue, Bahama Blue, and Flamingo Pink.
As the Emma says, "All the dyes are powder form – both hand wash and machine wash and come in 24 gorgeous colours."

Emma also explained, "Every year around August time DYLON® also launches 3 new fashion colours to reflect what is shown at the A/W fashion shows in spring of that year. Last year the colours were autumn plum, petrol blue and stone grey, which have been prevalent in all high street fashion stores. We are waiting to see what this year’s colours will be…"

I love learning tidbits of info about the background of a product.

By the way the lead in video for the Dylon site if you just do Dylon.co.uk is quite fascinating. Annoying if you are wanting to go straight to products, but fascinating.

Friday, 15 January 2010

overdye


The overdyeing is in process. In the small container is the piece like no.1 from yesterday that I was already overdyeing. This time I am leaving it at least 24 hours (after wringing the excess liquid) just to make sure it will cure at room temp, rather than the cold temperatures.

Piece no.1 has also been given a start at something new. It has orange, brown and a bit of red.

I decided to see what would happen with some of the dye I drained off. I had dumped them together. Before I drained the red dye liquid from the piece in the small container, the liquid was a blueish purple colour. With the red liquid added, it is a burgandy colour. Of course because it has melted snow, it is diluted, but I thought I would see what would happen with it. I have an old stained damask tablecloth someone gave me, so I scrunched it up and put it down in the liquid.

Tomorrow I will see what it looks like and if the dye liquid is strong enough to have done anything. For this, I am not really looking for anything stellar, it will be one of those pieces that will make up its own mind what it wants to be.

Thursday, 14 January 2010

Snow Dyeing - results

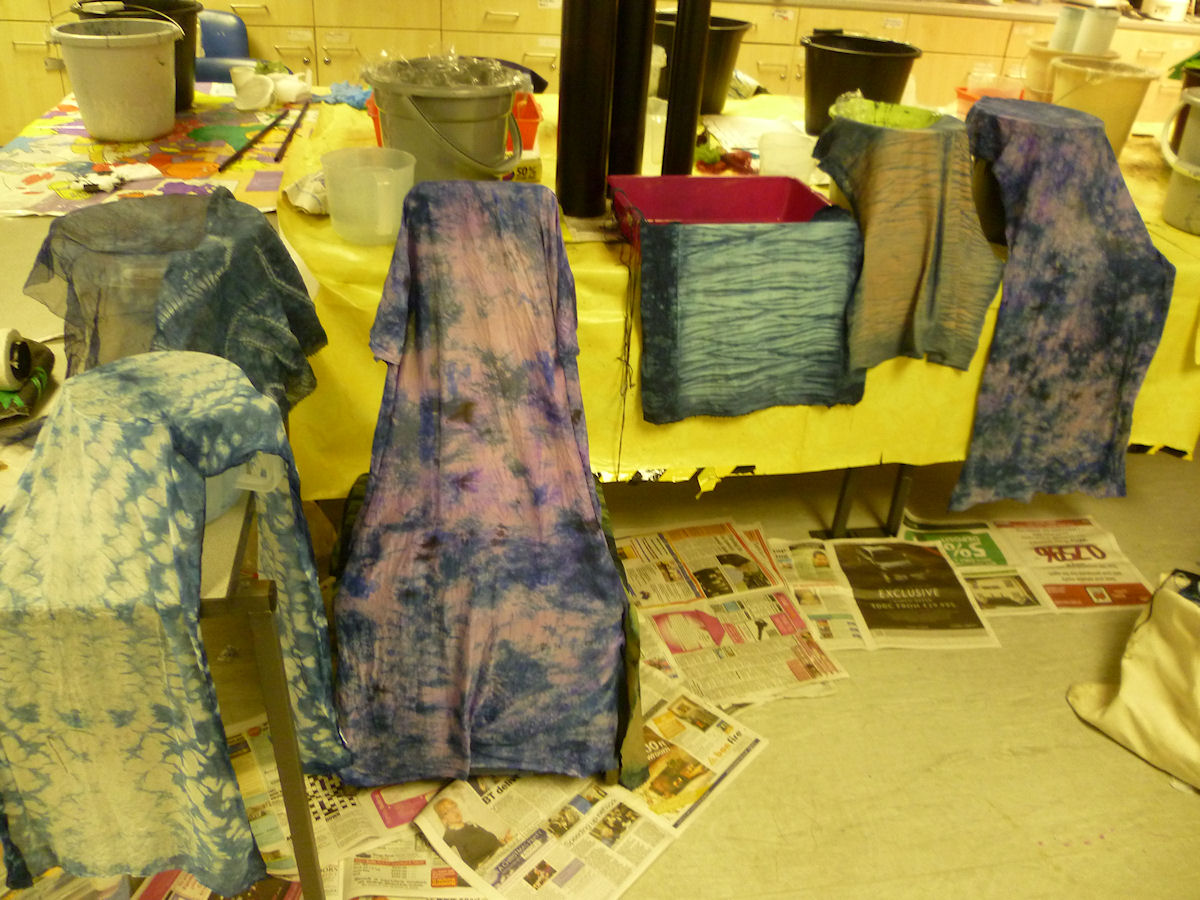
Mixed results for the snow dyeing, so mixed feelings about it.
because I was experimenting, the fabrics were varied, as was the pre-treatment and the container size. I think all these things made a difference in the results.

Beginning info: The different fabrics were all cotton.. some cotton lawn, some cotton from a quilt shop, some quality cotton from a workshop I did at Houston in America, also a piece of cotton pillow ticking.
Normally I get good results from Dylon hand dyes without the addition of soda ash to the fabric because it I have been told it contains something of that sort already. Some of the fabric had already been treated with soda ash, most hadn't.

I think I will show the results from sad to glad.

1. yellow/orange/scarlet - larger container/no soda ash/quilt shop cotton
Very sad, I didn't even bother to iron this. I am going to overdye it with brown. You will see why later.
results: NO patterning at all - perhaps the container size? It was lovely bright orange, but most of the colours just all washed out. I have had this happen before with colours I used with scarlet. It may be that it strikes more quickly and so the other colours haven't a chance. There was a companion piece that had more white areas so I didn't rinse it out at all, but am overdyeing it with using the snow dye method using red. We will see.

2. green - smaller container/no soda ash/pillow ticking

sad, but I can find a use for it.
results: no patterning except the fold marks where the fabric was scrunched.

3. cherry red/black - larger container/no soda ash/cotton lawn
okay, at least looks somewhat like hand dyed fabric. you can tell that the black separated out. The black has a lot of blue in it, so it blended with the red and made the mauve colour.
results: fairly normal low water immersion patterning. I may over dye this with something using low water immersion techniques to retain a lot of the colouring that is already there.

4. royal blue/black - larger container/no soda ash/cotton lawn
okay, the black helped to create more tones of blue. The white area is actually a sort of dull grey, so the real colours are more like a stormy sky than a nice cloudy sky.
results: a bit of the snow dye patterning visible here and there. This may also get some other dyeing treatments, if only to do something about the grey areas.

5. purple/green - small container/soda ash/quality cotton
glad! - But, where is the green? It has just made it a bluer purple, but you can see where the purple separated into fuchsia and blue.

results: you can see the crystal patterning in many places. This is good. I am thinking the soda ash is necessary to use with the cold of the snow, even with Dylon.

6. purple - small container/soda ash/quality cotton
even more glad!
- you can really see where the purple separated into fuchsia and blue. I like this, and I am not actually a purple/pink person! I do wish I had been able to tell which of the small containers had which fabric after I put the snow on. I would have preferred NOT to have 2 purple pieces. However, I am sure that I will find I "need" 2 purple pieces somewhere down the road.

results: you can see the crystal patterning all over. This is very good. Again I think the soda ash is necessary with the cold. But I also wonder if the small container had something to do with it.

7. yellow/brown- larger container/no soda ash/cotton lawn
WOW! Very glad! okay, this is the surprise. no bumblebee fabric here! you can see blues moved out of the brown. the yellow does show in places and also helps to lighten the dark brown in other places. I can think of a lot of things to do with this. and now you know why I am going to overdye the sad scarlet piece with brown!

results: awesome patterning. and without soda ash or being in a small container. who knows? But I like it.

Overall: I think it was worth the experiment for the last fabric, but I don't have the time and money to be messing about for 3 nice pieces and 2 okay pieces. I will stick with normal ways of dyeing...and even then, if I am looking for a certain type of fabric...say for dragons, I will buy some from someone who already knows how to consistantly get the results I like.