Tuesday 30 June 2015

to the photograph stage

So, on Saturday, I spent most of the day on the gown.

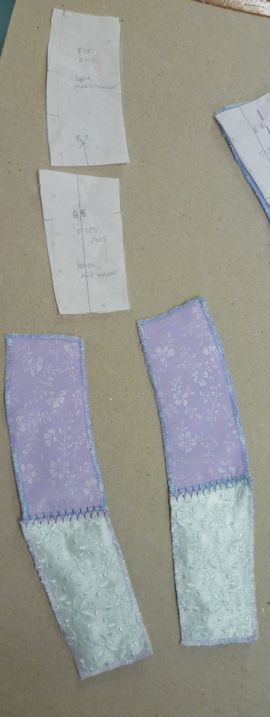
The little bolero was sewn up. Lace scallops were added to the gown and the bottom of the bolero.The scallops were already on the back because I had enough to cut it that way, but I had to add them to the front pieces.
front

back
I hadn't got enough of the scallops to put round the neck of the gown as well as the neck of the bolero. So, I decided to attach the bolero and the gown. Another reason was that with all the quick changing that has to take place for the Fashion show, I didn't want the bolero lost or damaged.

And then I played with a bit of the rest of the lace and came up with 'sleeves'... Actually 'drapes' from the top of the armscye.
The first one worked wonderfully and I started on the other side. But at this stage it was near the end of the day. I wanted to take photos that would be close enough to the finished product to send off before the deadline for their catalogue. I also wanted the background to be the beautiful blue curtains in the community centre(covering a large mirror).

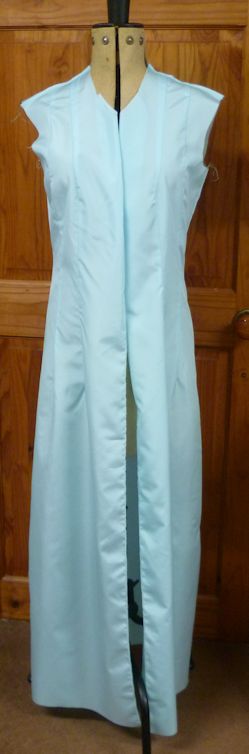
So, photos staged for front and back view so as to see the one sleeve pinned just right.

So, front

and back.

And then it took me several hours when I got home to write the statement!

As you know, I have no problem coming up with words, but trying to trim them to around 50 words "of descriptive text and image - include fabrics, techniques and patterns used." Well.

So, I did go a bit over 50, but not much.

‘Lilac and Lace’
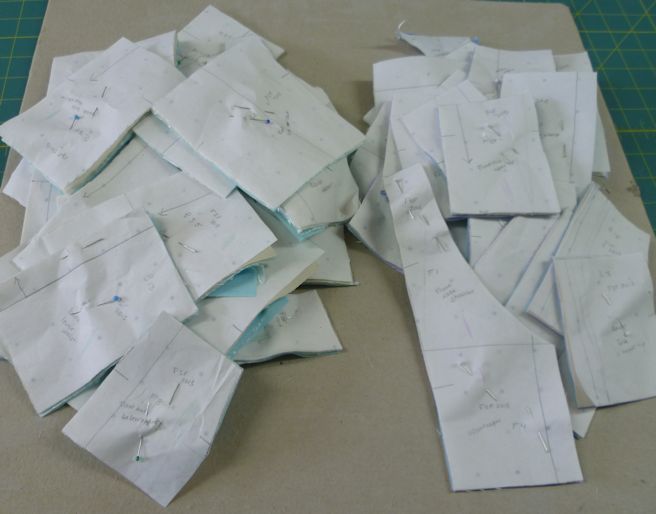
Sandy’s ‘patchwork’ is developed from her own garment design. Each carefully numbered pattern section was cut from taffeta and embroidered satin. Sandwiched pieces edged with zigzag were butted together and joined with a bridging stitch. A friend’s discarded lace fragments are now a graceful bolero topped with a sprinkle of embellishments.

As you can see from what I have told you, the embellishments are still to come. But the photos will not be all that big in the catalogue...and the drama/theatre/surprise will be the sparkle in the darkened room with the spotlights on the gown.

Or that's my story.

And I am looking forward to relaxing my way through July stitching beads and sequins onto the lace and gown. Not an overwhelming amount...just enough for the sparkle on the catwalk look.

I am quite pleased to get it to this point in 2 weeks instead of the month I had planned to have. I sent off the photos and statement late Saturday evening and got confirmation on Sunday. So, yesterday and today I have been getting the sleeves sorted and the lining sewn in.

And figuring out the part of how the model will get in and out of it! At this point, the front in the photo is pinned!

Monday 29 June 2015

Apologies for the delay

Saturday was a long but productive day. So the next bit of the story has been delayed.

Anyway.
When I was looking for something to make the gown special, I decided to look one more time in the cupboard of shiny/special bits. I thought I had looked at all the purple or pale sea green.
And there was a bag of lace scraps! My friend has an alteration business and these bits came from a prom gown she had made. When the scraps were offered, I knew there would be a reason for them at some point in my life.

And so.

I tried out a few ideas and loved the look of trimming. There was a good length of scallops I could use.

I tried out motifs scattered, but that wasn't it.

So, I laid a length across the back just to see what might happen.
OH yeah! a little bolero.
Too exciting to photograph, I got right onto it.
Do you spot the problem? Not the bit at the shoulder of the front pieces, that was me by-passing several steps, but getting rid of the darts.

The Problem? In trying to be sure I was cutting the lace so that the motifs were going to be on the right level, I ended up cutting 2 fronts!
Oh dear. That was all I had for a big enough piece to cut - or at least if it was not aligned totally differently to the rest.

But I managed to cut it almost the same and patched a bit onto the area under the arm.

So, that is what I was doing late Friday night.
Tune in again tomorrow for more in this story!

Sunday 28 June 2015

And the bead keeps going on...21-27 June

Week 26 June 2015

no.172


no.173

no.174


no.175


no.176


no.177


no.178

Friday 26 June 2015

nearly there on the gown part

So, I had to take a photo of all of the pieces joined while still somewhat flat.

And then with the shoulders done and a bit of edging work on places like the side slits below the knee and so on. Just enough to give it a bit more definition, but not so much to really stand out.

Front

Back

And now I am very excited because the draw in your breath bit has declared itself...and it is not a lot of time consuming work. I think, at this point, the front closing will work with that plan, too.

But you have to wait for the story for all that because I want to get it to a certain point before tomorrow. We are having the Offcuts sewing group tomorrow, and it is a longer session.

SO, I hope I can get all the work done on the gown. and possibly get photos, as it is a brighter lighter space there. and then I can send in the photos 'before' the deadline. Then, the photos in the catalogue will look like the finished gown.

and with the pressure off, I will stitch the lining in. The gown could be worn without the lining, but I think it will help it to hang better. And the student models won't be scratched to death with the metallic thread.

I could even take it a little further, having extra time, with a bit of 'subtle' beads/sequins. Not that they would be subtle close up, but add just a bit of spark in the darkened room under the lights on the catwalk. The subtle would be that they wouldn't be that noticeable on a distant shot for the catalogue.

Thursday 25 June 2015

a bit more progress

The patching continued and here are the front panels pinned up.

Then after a bit of an auditioning process, some plum/lilac metallic threads used to join the fronts.
You can see how the shaping for the bust has come together. It took a bit of smooshing of the right patch because it had nearly an angle. But it worked.

And the first side front joined up.

This was not without much headache because one of the chosen threads is not coming off the reel as it should, so there is a lot of rigging of stands and all sorts which only seem to work for part of the time. Still I am trying to get the fronts done, and then I can change it for something less temperamental for the backs!
But, no photos because I do have some pride...I don't want to show you the jumble that is at the side of my machine! But, generally I can find what is there, so it works for me.

NEXT: considering what will turn it from a gown of patches to a gown to show and cause that draw in of breath that I look for when the model comes out onto the runway.

Wednesday 24 June 2015

Getting it together

Stopping for lunch for an update for the impatient amongst you! The comments made me laugh. You are as anxious to see this as I am! Glad to know there is interest. I get anxious to see if the plan I have in my head will come out as I hoped.

So, the next worry was about stitching the patches together. But compounded by the concern about keeping them in order!

So, the order of the whole gown.

And column by column I am laying them out and ticking them off.

The numbering of pieces at the start, before chopping the pattern, has paid off.
Joining patches together.
There are very small issues now and then with the embroidered patches matching up. I think that because the fabric is not as firmly woven as the lilac fabric, it may have stretched a bit. But I have found that it is pretty easy to ease in any small differences.

I started with the centre back because I had decided to cut them on the fold. I am glad, because it gives a sort of solidity to the movement of the patchiness.

I am doing 'columns' first, because when sewing a garment with princess lines, you would have the 'columns' or panels which you would join together. So, with the horizontals joined first, there is more control. SO, the vertical seams will be more likely to retain the vertical lines without wandering.

And back to work!

At this point I am mentally deliberating about the title...


Tuesday 23 June 2015

more sampling

Well, I had thought I would be done with the zigzagging. But I still have at least a day's worth to go. The shoulder was limiting me a lot.

But, as I said in reply to Kathy's comment yesterday, I was starting to get to the point where I really didn't think this whole joining back together thing was going to work!

So I took time out to find out if it would.

I had thought to do 'faggotting' or 'bridging'. a Heirloom sewing technique sometimes used in garment making. This tutorial shows how to do it by hand. You can also do it with the machine. I have little spacers that fit my machine. But I couldn't find the instructions. and to tell the truth, having looked for that last link, I did what it says there, but was not convinced. I think it would probably work better if you have long lengths of seam like shown, rather than wee patches.

So, plan B: Butting edges together and then doing a joining stitch.

(The step in the centre is not in the plan, but happened with the start of one of the stitches I tried...and abandoned!)
I had not allowed for a wee space anyhow. So, I will be happier that everything is somewhat near the original size and goes together if I butt the edges together.
I really like the machine feather stitch, so I tried that. It would work, but I risked covering all that tedium of metallic zigzag. So, no.

I tried a few others and opted for a stitch listed in my 'quilting stitch' section.
Then I played with the width and length. The default needed to be just a bit more width so that it wasn't falling in the middle of the zigzag on each side.
I also wanted it to be a bit more length so that the stitch is open enough to show all my hard work beneath.

When I get closer to having all the edges done on the patches, I might take a few hours break and begin to join some of them so I can see how long that takes!

There are a few more things I would like to do. But at this point it is about timing. I will tell you if I get time for that option or not.

I need to get this to the point where it looks somewhat like the finished product for the camera. Sending that and statement off for their catalogue. I will have time to do finishing off...like lining hem, etc, but this year I am NOT finishing things like fastenings the night before the show.

Last year was the first time they did a catalogue. I thought that when they asked for photos by a certain date that they were trying to ensure people didn't pull out. That is how it worked for another show I did gowns for. So, I was rather dismayed to see my in progress photo in the catalogue! I had been invited very late, and had to fit it in with other obligations.

Anyway, I am on the feeling hopeful stage of making. (It is a cycle you know. Very excited to get started. Very worried before the patterning; then up again. Very bogged down at the tedium. Thinking ahead to an alternative if you run out of time. Turning point on making progress and then worry about the construction solving. and so on!) I hope the hopefulness increases!

Monday 22 June 2015

Zigzagging

I hope your vision of me over the weekend was stitching the zigzag on the edges of each of these pieces.
We aren't discussing how many at this point, especially as I am still working out the joining back together! But suffice it to say that each long side of front or back is 36 pieces. and with 4 sides (2 front + 2 back)...you do the maths!

So, the two piles needing to be stitched

and one of the piles which was already stitched.

The stitching is easier to do with the shoulder than the cutting was. (But it is tedious!)

My set up at the machine.

I use a blind hem stitch when I cover edges of things with zigzag. It helps the stitch to properly form over the edge without drawing the fabric up into a lump. My blind hem foot has a little bar, so the stitches form over the bar and then slide off it to the back as the piece goes along.
The little red bit at the front of the foot is adjustable for guiding your project edge along. For using the blind hem foot as a blind hem foot, it would be useful for getting it right for the 'bite' of the blind hem stitch.

You can  see the threads I will be using. The dark turquoise is what I am using on the lilac fabric. It is much paler when seen as a single thread. I am not doing a very close zigzag. Just enough to hold the edge together and add a bit of glistening.

If I get it right, I can go from one piece to the next like quilters do with chain piecing.

Saturday 20 June 2015

And the bead keeps going on...14-20 June

Week 25 June 2015

no.165


no.166


no.167


no.168


no.169


no.170


no.171

sampling

So, now that I chopped out the pieces of the pattern and the mull together, I am ready to cut out the fashion fabric.

In this photo, I have the pattern pieces which will be of this lilac coloured fabric and I have arranged them for being conservative with the fabric.

I have also cut the rest of the pieces from the embroidered sea-green coloured fabric.

And so it is time for sampling.

And here I found that the mull on it's own was not sturdy enough to support the fashion fabric to do my planned zigzag edge on the fabric pieces.
And also the mull being a somewhat loose weave, leaves whiskers on the edges! Especially on the embroidered fabric which isn't as sturdy as the lilac one.

So, I am being very thankful that I have plenty of this taffeta fabric I used for the lining. So, I tried using it at the back of the little sample sandwich. (Fashion fabric, mull and taffeta) and this also brought the realisation that in some cases the back of these pieces may be seen, and thus the lining fabric is a good plan. So, more cutting is called for.*

As for the thread sampling...
I showed all the different threads I was contemplating. And then when the chosen one wasn't really doing the job, I looked over and saw these wonderful threads!

They are metallics from Sulky. But they glisten in pastel colours instead of your normal metallics.

And there were a few that were just right.

So, the chosen top thread has become the bobbin thread. That way, if the back side of the pieces is seen, it will still be lovely!

Bobbin thread - Sugar and spice from Thread Studio

And yes, I realise at this point that I could do away with the mull altogether. But, oh well. I am being stubborn about it because I took all the time to cut it out!

*Please imagine me doing all this cutting with a shoulder that is shrieking pain for some reason. The hypersensitive nerves seem to say the shoulder is dislocated from the neck. (This is called Fibromyalgia doing its thing.) Even if it is not dislocated and will probably be fine next week, it still is very painful!

Oh yeah. It is very hard to use your non-dominant hand for stuff like this!

Friday 19 June 2015

Chopping

So the other day I said I would explain the chopping part.

I am using these scissors because they have a sharpener.
You store them in the sharpener, every time you slide them in and out they get sharpened! So, I am using them because I am cutting the mull into the planned shapes - cutting the fabric at the same time as the paper. And using these scissors will mean that any dullness caused by the paper will be sorted.

And here is the start of the chopping.
I mentioned the other day about the darts being left out when you cut the princess line; you can see it here. Cutting on either side of the dart and then I carried on down the princess style line. Not pictured, but you can imagine, I also cut on both sides of the waist shaping fisheye dart. The fabric from the dart is discarded.

In this case, I am not using seam allowances because I am going to use each piece I have chopped in an individual treatment. If I were doing a princess line dress altogether, I would cut the pattern first and then add seam allowances alongside the cut line - the paper in the dart area discarded.

You will begin to see how I am working with the chopped pieces tomorrow.

I will add that after using a rotary cutter for cutting garment pieces, I am finding in using the scissors the reasons I prefer the rotary cutter! You have to lift the fabric at least a bit in order to put the blade under the fabric and then cut. In some places this is quite distorting...and these scissors are designed for the bottom to lay against the surface with the handle angled up for cutting. It is still not easy. And when you take the scissors away, you find there are bits that need shaved away with the rotary cutter to make them just right.

Again, I wouldn't be so worried, but because I am using each piece in its nett state - without seam allowance - I need the pieces to be accurate so I can fit them back together.

All very technical!

Thursday 18 June 2015

Mull

not Mull of Kintyre type mull, but mull as in fabric.

I wanted an interlayer to support what I am going to do with the chopped bits I referred to when I talked about the pattern. Thinking and looking in the cupboard of possibilities. (Not the actual name of that cupboard, but I like the idea!) I didn't want it to take over the structure or take away the drapability. Okay this doesn't seem to be a word, but I mean the draping capability!

And then I remembered a roll of fabric my sister-in-law gave me when she moved. She had meant it for curtain lining.
A bargain at £1.59 per metre. Yet 35 metres worth is still a bit of money!

So, this is mull.
But if you got it from Ikea, it is bomull. Which apparently is the Swedish term for cotton mull.

And now the interlayer is cut and ready for chopping.


Wednesday 17 June 2015

Lining

And as I mentioned, the lining has duly been cut and sewn.
Lining cut

Darts are amazing for the kind of look I like. However, I dislike them greatly. Not exactly sure why except it is probably because after all the patterning and cutting I am so ready to sew this thing (whatever thing it is I am sewing) and then I realise I have to mark and sew the darts first!
Lining Back

Lining Front

I used French Seams at the sides, but stopped the second pass at the knee because I am still thinking about how I am going to achieve the look I want.

For me the look also involves how it will move. So, I have this video in my head of how the lower part of the gown will move when the model walks. It may require the side seams to be open from the knee. I would prefer not to take out 2 lines of stitching if that is the case!