On these last two, for the 'pointing out' washers I used larger washers.
I miscalculated at the beginning and used two out of the 30 I had to work out how to do them. For the ones pointing in, I had 32, so didn't have that problem. But what it did was to give me a chance to use larger beads to fit in the gaps. So, these are not quite a set, but when mixed together it isn't a problem.
no.180
Due to the frantic last minuting on the Horizons piece, I am behind on these this week...oh no, and it is the half-way mark!
But not to worry, I will finish them this afternoon and will still be within the remit of sometimes being allowed to get ahead or get behind.
I also had the Offcuts sewing group Saturday afternoon and spent the whole time pinning and re-pinning my pattern on almost but not quite size piece of fabric. It took me from 12:30 to about 4:55 to get to the point where I cut out one piece! I should have started with one of the larger size bits of fabric, but I quite fancied a sleeveless blouse out of that one.
And so, once home, I was trying to catch up with the beads on Saturday night but it was just ending up more haste, less speed. and then a bead from the first round broke when I was going round for the 3rd pass, so I decided that was enough of trying to save face.
as my husband's mother used to say - 'my head is full of broken biscuits.'
Check back Sunday night to see if I managed to catch up! or if the brain is still AWOL.
By the way, the Horizons piece was due the 1st July. I posted it Friday and got word it had already arrived on Saturday. SO one thing worked out!
***I caught up, but need to do photos. We spent a long time on the phone with my son who is in America.
Got the sleeve on and spent some time trying to get a decent photo...not so easy with a larger piece because you have to be further away to get it all in the frame...then either the top or the bottom is out of focus or in shadow.
Anyway!
Here is Visible Horizon, my entry for the Contemporary Quilt exhibition to be at Festival of Quilts this August. Click on the image to see it larger.
The Horizon you can see depends on Location and your Point of View.
I adapted a scientific explanation about the distance to the horizon to make it more of an epigram or witticism.
And a detail photo.
I am linking this to Nina-Marie's Off the Wall Friday. Go over and see what other creative people have been up to.
Nearly ready to send the finished piece off...looking for the address and to see if I have everything on the checklist. Oh.
At one point I knew I needed a 20cm square sample, but this has not remained in my head. So, quickly this afternoon I dug around in the scraps for enough to make something which will show the techniques even though it is not a copy of the design. Not enough already cut binding, but leaving the edge will allow people to see that the dark fabric is a full layer under the top fabric.
Just need to stitch on the sleeve of the full piece and parcel it up for sending in the morning.
This week working with pink - some accent, some the focus - and also using some slightly larger beads for a few washers.
no.168
no.169
no.170
no.171
no.172
no.173
no.174
I really like these with the silver and with the one above. Those beads aren't gold, and sort of light copper. I think I will carry on combining them with others for the last week.
Yesterday I went to the quilt show at Sandown.
Here are a couple of the pieces I liked very much.
Child's Dress by Jackie Harvey
Crowning Glory by Lillian Harris
Hadrian's Bag by Glyn Molyneux
subtitled
'Off Duty Centurian's Day Bag'
And Ferret's awesome work using her technique of small pieces of fabric for the wolf, the reflection is her thread painting. I didn't remember the title.
I had a dreadful headache which had started to go when I left here, but then I sat in several long tail backs so by the time I got there I hadn't much time and not much of a brain!
I wanted to get some more of the script fabric I have used for the Ramshackle series. But no luck. However, it means I am finding ways to develop the work further. So I managed to find some fabrics which might make a good replacement...and not at full whack prices either! I can't believe the cost of quilting fabric now!
Plus I met a lady just getting into Art Quilting but not aware of the variety of shows and groups she could connect with. She isn't too far from Bracknell, so she may be able to come to the TVCT meetings.
The feedback I got on the scarves I made was that although they fit me, they needed to be a bit larger for my family member. Trouble is, I had already cut out about 7 at previous size.
Due to struggling a bit with my own health, I was having a hard time getting my head round how to make them larger without much fuss.
Then I saw this video the other day on another textile artist's blog. She was making some blankets for a grandchild. When I watched it, I thought I could use the same process to add a border to the scarves I cut.
I had some thin voile type fabric given to me by a friend recently. I thought it would be just the thing to add a border, but not add a lot more thickness.
The only thing I did different to the video was to press the seam allowances over to the solid fabric so they wouldn't show through the thin fabric on the border. I just took the seam, smoothed the fabrics away from it and then folded it over and pressed. The fabrics at the corners didn't get in the way then.
I turned it through, pressed and topstitched on the edge of the middle fabric to hold the layers together. Just like the video. Then I folded corner to corner, pressed the fold and put the wadding in the centre. (See how I did it here).
Then I stitched it through all layers, like I did before.
The wadding is enclosed,, but the rest of the layers are loose. I am hoping this might also help with the issue she was having about adjusting the scarf so her head didn't show through the gaps at the back.
The original scarf was cut at 20in square. The piece I added was 25in square, but this is then folded in half in the process of making the border. I hadn't thought of that when I chose the measurement. I have sent 3 off like that which are made of lightweight cotton. But for the heavier weight cotton I am going to try 30in square for the border bit because it won't drape as well, and may still be hard to arrange at the finished size of 22 in. square. ( The 1/2 in from the measurement goes into seams.)
I still have some fabrics uncut, so when I find out how these work, I will just cut them at the full size and make them the previous way.
The internet was a bit random yesterday, so I didn't post. I have some other things to show, but wasn't too well today.
My Thoughtful man decided to have a day off and we went to the garden centre in the afternoon and bought an on sale apple tree. Which already has apples growing! which is much more than I can say for the one we have. It thought about having blossoms but the weather convinced it otherwise.
So this one is sort of a dwarf one as far as we can tell, (it hadn't got much by way of a label). And as it already had numerous apples growing, he potted it on into a large pot. We will see if the other apple tree decides to produce next year. If not, we may replace it with this one.
Anyway, I made another postcard for my family member.
Again, like last time, it was a scrap of fabric which I have drawn into with Triplus fineliners. It is a bit interesting how some fabrics allow the ink to bleed into the cloth and some don't. I think it has a bit to do with how dense the weave is.
A bit late for this today as I have been out all day, and didn't get the photos sorted yesterday. But here are photos of the finished Cedar Tree from the 'front door' of the little tunnel and all the way around.
Looks like there are places they would have attempted if their last day hadn't been cold and mostly tipping with rain. I went and took them a cuppa to say thanks and had a natter about working with wood. (My sis and I earned money for college by cutting and selling pulp wood for the paper mill - Dad cut the trees down and most of the time cut it into 4ft lengths, we did the rest! We also cut birch for people's firewood. and thus the condition of my neck and back!)
I was given some fabric a bit similar to the fabric in the first Ramshackle piece. I thought I would try a different type of composition.
and again, I have learned some things from this which will be helpful for the pieces I am making for CQ Horizons at FOQ and also my Contemporary Entry in the judged competition.
I am linking this to Off the Wall Friday at Nina-Marie's.
If you want to see the other Ramshackle piece I finished this week, click on the label under the post that says Ramshackle and you can see the different ones in the series.
For the first one - no.13, I was putting the adhesive on the fabric and then on the card, rather than the other way around. I was so focussing on the composition I put the adhesive on the front. So, opportunity for making it work. Colouring into it as well as the mark making.
The second one is for a friend afar who also is going through a long medical ordeal.
These are also giving me ideas for something more than a postcard!
I thought I was finished with Ramshackle House. I bound it Monday night. But I wasn't happy with the puffy look. (So I posted the stripe post yesterday instead.)
I am using a new wadding and I don't like it. It seems flat, but it gives more loft than my previous one. and of course, I only buy them King or Queen size and keep cutting out the little bits and pieces from the whole. I am tempted to buy another of what I had before...if I could remember what it was. sigh. I think cotton. This must be a blend. I bought it quite a while ago when I thought I was nearly running out.
Anyway. this was before extra quilting - photos taken at different times of the day.
daytime photo
and this is after.
night time photo
And yes it means I quilted onto the overlap of the binding in back. Oh well. maybe I will colour the cream thread brown at the back. and then save this for some situation where the back won't particularly matter.
So, the quilting was all I got done yesterday because I got one of those eye migraines and had to go to bed. no, actually, I sandwiched Ramshackle Hill before I gave up.
If the brain works, I will quilt Ramshackle Hill today... and leave it a bit to see if it wants more before binding it. It has smaller pieces, so there will be more quilting round those. It might be enough.
The prompt for this month on the Ideas of Inspiration blog is about patterns. This is what I posted about. you can click on the photos to make them larger. The composite photo on the bottom is best viewed that way.
It took me a while to work this one out. I had never really thought about it. I think I like organic shapes. But then when I stop and consider what sorts of patterns I take into my work, hmm, not so sure. But the more I have thought about it, I think it must be stripes.
I hadn't realised their subtle influence had become a sort of a basic for me as in the way people in fashion say things like brown is the new black (or whatever it is at the moment)
I have a series of work where I did corded pin tucks inspired by the boning channels in Tudor period corsets.
This is the page in my Research for Design folder from City and Guilds Fashion.
This led to corded channels to highlight the pattern in striped fabric. I have a whole box of striped fabrics to use in this way. This is a duvet cover on the floor in my studio. My friend was throwing away, but I had to rescue it!
However, I am following a stripe related side track at present where the regular lines of writing are being used as a stripe..like this fabric which I am using with the writing turned 45 degrees.
Anyway, the prompt spurred me on to go find stripes round my neighbourhood. I found the fences the most interesting.
Perhaps because both the negative and the positive create stripes?
***
I have nearly finished the Ramshackle House. Should be able to show it tomorrow.
It is starting to get warmer - wonderful! Sometimes though it is still chilly around my house. I had this green long sleeve t-shirt. Green isn't the best colour for me unless it is broken up a bit by other colours.
So I thought it would make a good spring like cardy. So I cut up the centre front.
I added a flowery trim on both edges and then on the sleeve hems to pull it all together.
I didn't realise til I put it on that it works with this blouse!
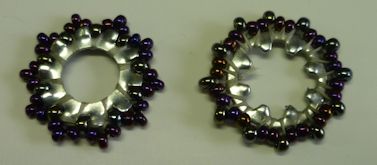
I mentioned last week I am beading onto washers this month. I intended to use locking washers, but had only been able to develop the ones with the points inward.
I took a bit more time on Monday and worked out a better plan for the ones which point outward. The companion to the one I tried,(pointing in) was also difficult, so it may have been the bead size.
Here are the 2 trial ones which worked (I showed the first one last week)
So, now I have matching pairs to go with no. 152
I had run out of the metallic greeny-blue beads from a blend of beads by this point, so tried these other green ones. Of course this is very close up, at a distance they look more like they match.
and 153 from last week.
and now for this week
no.154
no.155
no.156
using some multi-coloured metallic beads for the next few. They look one colour but when they roll around they look a completely different colour. I usually like to select the same colour, so I thought using these combined with a single colour bead would be a good way of using them up. - I used silver with them for 155. So went back to it for the rest of the week. With pink, then purple, then bronze and then copper.
no.157
no.158
no.159
no.160
and it worked! I only have 3 misshapen beads left from the multi-coloured ones.


.JPG)
.JPG)
.JPG)
.JPG)


.JPG)
.JPG)


