Saturday 28 February 2015

Sunny House

I took my Ramshackle ideas to the Offcuts sewing meeting. There were a lot of people there so a lot of running around to get enough tables for everyone. Well, there were enough, but we had curtain making, quilt tacking and two lots of cutting out garments going on!

But I did finally get a start.

The donation for the conference auction is to be 6x8in. But it will be matted with an aperture of 4 1/2 x 6 1/2 in. So I tried to centre the house.

I am going with a Sunny day mood with this one. I have done the cutting and fusing. It needs a bit of fiddling with some of the line, but next is layering and quilting.

These type of pieces work well for finding out if other prints and colours work. The spots are a bit large for my taste. But how would you know unless you had a go? I will see what it will look like matted before I declare my feelings one way or another. But as I have found with these houses, some people really like them! (To me, A mystery!!)

Friday 27 February 2015

Ramshackle ideas

The call has come for the SAQA donations - the small piece to be auctioned at the conference and the 12x12 piece to be auctioned online.
So, as tomorrow is the sewing day, I have gathered some pieces I am thinking of trying.

I want to see what kind of look you can get with totally different prints and colours.
Thinking of sunny days and so on.

Wednesday 25 February 2015

JQ 2015 - Cypress 2

The top of the Cypress is done.

I may have to attach a bit of the water soluble trimmings from the last tree to the bottom of this so I can work the trunk. I thought I would do the whole tree in one, but didn't think about fitting the whole into the hoop.

You can see that there is a bit of buckling from being in the hoop. I haven't tried to press it. I thought of it and then realised...oh. Steam = water. Not a good idea.

The water soluble I am using this time is the one from Art Van Go. I need to look it up on their site, but to be honest, I think it is also the same as from the other 2 vendors. No noticeable difference in the sewing anyway. Now to get the mathematical gentlemen in my house to tell me which is the best price. Without having worked it out, I am drawn to getting it from Empress Mills just because it is sold as yardage on a roll.

I love the texture in this one. I fiddled with my machine a bit and got it to run 3 threads at a time. That way you can give a more realistic colour because you are using three shades. and in this case, one of the threads was variegated, so that helped even more to keep from having the tree look flat. When you look at trees in real life, the are never all one colour. There are highlights and shadows as well as variations in greens depending on new or old leaves.

My previous Pfaff had two horizontal thread holders and on optional vertical holder. This has one horizontal and one vertical. But I put two threads on a thread stand. Here is a photo of the thread stand I took some time back.
I created an extra thread guide by putting the thread through the slot on this disk and slipping it onto the horizontal holder.
I tried it with a thread on the holder and this set up, but there were problems with the thread twisting round the stick bit between the reel and this disk.
I was very pleased that there were only one or two times that a thread shredded.

JQ 2015 - Cypress 1

Starting a new tree. I am going for a pillar shaped Cyprus tree this time.

I am doing little scribbles all over like I do when I doodle a tree in a meeting or something.

Tuesday 24 February 2015

Stitched Trees - 7 - Tree in a Forest

Today I finished sewing the binding on. And the tree tacked down through the centre area.
And here we are with Tree in a Forest.
The edges and binding are a bit wonky. Somehow I struggled to get the corners right this time. But the background for this one is about having a place for the tree idea. A sample, if you will. I have to make a note that if I am doing single fold binding wrapped to the back, it needs to be 7cm if I am going to stitch 1cm from the edge. Not 5cm or even 6cm(which I tried this time). It doesn't wrap round properly. OR if I do cut it a smaller width, then I have to have a narrower binding or use it like a double-fold binding.

Initially I said I was going to trim this and use it for a journal quilt as well. But, No. Too much work in it!

So, now that I have this one under my belt it is time to do another for the first tree journal quilt. (12in height x6in width). I am looking forward to the drawing part.

I was having a conversation with one of my friends, Helen, who lives up north and I see rarely at a show. We were talking about how we actually love the 'drawing with the machine' part. So, we made a deal to do more of it. Sometimes life gets too much in the way. and/or you get involved with other things. But something has to be said about taking time to do the type of work you really enjoy.

Sunday 22 February 2015

And the bead keeps going on...15-21 Feb

Week 7 February 2015

For the first 14 days, I used dark coloured copper sequins. For the 14 days of the rest of February, I am using the bright coloured copper sequins.
which of course you can't see in the photos anyway!

And even this is not too clear...I think you can click on this photo to make it bigger.
Top stick has dark copper against the wood for each arch.
And bottom stick has bright copper against the wood for each arch. The flower/cog sequins are the same for all the sticks.

And so this weeks beaded sticks...
no.46


no.47


no.48


no.49


no.50


no.51


no.52

Saturday 21 February 2015

A random sock post

Okay, here is another story for you.
Quite a few years ago, I had a favourite pair of socks (because they were black with turquoise).

Then one day - possibly after the Thoughtful Man was doing the washing and I was ill or away - I could only find one. No one had any idea what could have happened to it. And unlike when they ask me, they couldn't offer any suggestions or possibilities.

Since they were my favourite pair of socks (because they were black with turquoise), I kept the found sock on the top of the drawer set in the bedroom for some time.
At some point, our washing machine died and we got a new one. I got The Thoughtful Man to look in the trap...just in case the washing machine had eaten it. To no avail.

Eventually, still hoping against hope that I would find the other since they were my favourite pair of socks (because they were black with turquoise). I put them in a drawer.

Fast forward to preparation for the Pancake night on Tuesday. I am looking for the white lace tablecloth that makes using a single sheet for a tablecloth look fairly posh(when the dining room table is extended fully). Not where it should be, in the chest of drawers that serves as tablecloth and dish towel storage in the dining room.

Perhaps it is in the airing cupboard. Sometimes I dry it there as it is so fine it does no good in the tumble dryer. No lace tablecloth.

However...under a pile of towels at the back...

The other half of my favourite pair of socks (because they are black with turquoise)!

So I wore them yesterday...and then wished I hadn't because they are better for warmer weather. But still...

To be honest, when you wear them, you can't see the turquoise because it is under your foot, and the top bit is under your trouser leg.


Oh, I never found the lace tablecloth. I had to use the smaller cream coloured one for when the table is small.

Friday 20 February 2015

Stitched trees - 6

Background forest built.
The tree is just sitting on there while I consider it.

I was going to stitch round the edges, but I like how it stands proud of the background and the shadow makes it look 3D. So, I may just stitch it here and there in the centre...almost like tacking it in place.

It is propped up so it catches me off guard when I walk in here in the morning. Then you are seeing it as a whole and not as separate parts you have done.

I am linking to Off the Wall Fridays at Nina-Marie's. I haven't done that in a long time. If you have come from there, scroll down to see the rest of the process photos for this work. All the posts for Tree in A Forest are at this link.

Thursday 19 February 2015

In memory of lovely friend

Yesterday I had very sad news about a special sewing friend. Juliet.
Juliet passed away last week very suddenly. She will be greatly missed. Such a lovely lady. So generous to share her baking with us at each meeting.
She had been looking forward to traveling to South Africa this week for a family wedding and to see her sister.

Juliet was one of the original Thames Valley group who started the Offcuts sewing meetings. There will be a very empty spot over to the right in the middle.

Tuesday 17 February 2015

Stitched trees - 5

Today I am building a bit of a forest to go behind my tree.

Whilst preparing the house for about 15 people to come round for pancakes!
Actually, Mr Thoughtful is doing most of the prep. He makes the pancakes. But he also mops the floor and moves tables and other things I can't do.

Monday 16 February 2015

Menina de Favela e Água - featured

Last week I learned that my little Brazilian girl is featured in two places on the internet.
Menina de Favela e Água

The SAQA blog had an article called Shibori in Art Quilts. Among other descriptions of shibori and how it has been used, there is a paragraph about my piece.

Also the Front Page of the Contemporary Quilt website has member work from the Pictorial category from the Festival of Quilts. I had entered the piece into that category.

Sunday 15 February 2015

And the bead keeps going on...8-14 Feb

Week 6 February 2015

no.39


no.40


no.41


no.42


no.43


no.44


no.45

Saturday 14 February 2015

Stitched trees - 4

After the success of the top part of the tree, I thought I may as well carry on experimenting whilst doing the trunk.

I had finally found my machine embroidery hoop...it goes under the foot easier. This was also good for holding a bit of the water soluble fabric which I had trimmed away from the first part.
I wanted to see how the ws fabric behaved when a skimpy amount was used. 1-less wasteful. 2-I am prone to work on scraps 'in case it goes wrong' and then find it doesn't go wrong and I have a good bit of work on a wee bit of scrap!

I drew a bit of a trunk for guidance...and then ignored it when I stitched!

The threads this time was Thread Studio's Fed (I think for Federal? anyway, it says Fed on the reel.) The variegations went from a sort of claret to lime green with browns in there too. Because I wanted the overall look to be brown, I also used a lighter brown Madeira embroidery thread on the horizontal thread holder. The Thread Studio reels work better on the vertical and with one of those nets round it to keep the thread coming of regularly and not catching round the thread holder.
The bobbin was a random brown from the stash.

The stitched trunk before I trimmed away the ws fabric.
You can see the edges of the loose grid I stitched. I wasn't sure how well the threads would hold together because this time they were all running pretty regular up and down. Though I didn't stitch the whole trunk all the up and all the way down, but in sections. There is a bit at the top right that I could see wasn't really connected, so I trimmed that away as well.

As you can see, the scrap held up very well to the stitching. I did stick one little piece on, but it was more to use as a little bit to hold onto because that section was a bit thinner and I thought it would distort. Keeping it taut helped.

Trimmed Trunk

The trunk with the ws fabric washed out.
The edges are a bit scruffy.

But, I have pushed the threads together at the side while wet as I was blocking.
Any small amount of water soluble left in the thread work acts as a stiffener for stand alone lace pieces, so it will hold the threads in place when it is dry.

As I said with the top part of the tree, I will be stitching this onto the background, so I can make sure the sides of the trunk are smoothly attached.

You may be wondering if the thread colours used for the trunk and the thread colour used for the top section work together. You can see them both here. I think it will work. I have a background in mind, so I should be able to show you more about that next week. (bead day tomorrow!)

Friday 13 February 2015

Stitched Trees - 3

Oh yes, how long did it take to make the tree part I showed you yesterday? Several wonderful drawing-with-the-machine hours!

The thread on top is Thread Studio's Victory variegated thread Middle Earth.

I used different random green threads from my stash for the bobbin thread. Fill bobbins, use bobbins. fill more bobbins with next random green. (It takes a lot of thread.)

So, the next part of the experiment is to see how the water soluble fabric dissolves. I trimmed the excess from around the stitching first.

I was pleasantly surprised that the visible ws fabric dissolved straight away.
This photo was taken after the work had just been dipped into water...no scrunching and swishing.

I left it to soak, and after popping out to the shops, I pulled it out and rolled it in a towel to get out the excess water.
Then I pinned it to the foam core to block it.

I am very pleased that the piece was so well contained. Nothing floating about unconnected. I am not worried about some of the fringes at the edge, because I will anchor it to a background with stitch.

You can see in the top photo, that I had stitched a grid of sorts...somewhat organic arcs instead of your normal grid... because I wasn't sure what was needed to hold it together. I didn't want obvious squares in the lacy part.
I don't know yet whether I will want to go in and trim the fine lines away. It will depend on what it looks like on the background. At this point I am leaning towards leaving them.

Tomorrow, the trunk of the tree.

Thursday 12 February 2015

Stitched Trees - 2

Okay, yesterday was a bit too nostalgic. But you can see the interest in trees!

*****
As well as the Journal Quilt theme, I have also been thinking about trying a cold water soluble fabric which is sturdy enough to make stand alone thread pieces. I saw a video on-line where the artist (Meredith Woolnough) used this type of water soluble for her lace-like images of items in nature.

I was impressed about the way the w.s. fabric could be worked so intensely without ripping. I also like the way it behaves like... fabric! I don't get on well with the plasticy stuff.
And because you can dissolve it in cold/lukewarm water, it should be easier to work with at that stage and kinder on the thread than boiling water.

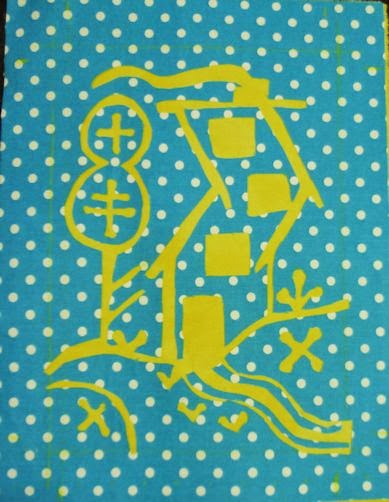
To add to the way the thoughts were piling up towards the tree theme is this...
There is a small group of us online who are following prompts to work up a piece in A4 size every 2 months.
I am using it as a way to work out ideas for larger work or continuing ideas for some of my series. You saw my Cycling piece and the Refugees piece.

A4 is just a bit smaller than 12 inches and around 2 inches wider than the 12x6in size for this year's Journal Quilts with Contemporary Quilt. I figure I can make up the A4 a smidge taller, and then trim it to 12x6. You don't get in trouble if the size is not spot on!

Or that is the cunning plan. The A4 group prompt this time is Into the Woods. So, it all begins to shape itself into a plan.

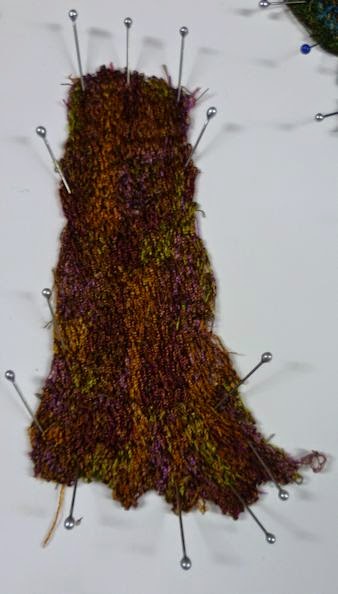
Here I have begun to do the stitching on the water soluble fabric, or fleece as it is sometimes called.

At the Knitting and Stitching Show, I bought a bit of this water soluble fabric from 3 different vendors. I decided to try each one to see if there was any noticeable difference.

This first tree is being stitched onto the w.s. fabric from Empress Mills. The others have the price on it, but it is sold as a specific amount in a packet. Empress Mills sells it as yardage. Solufleece - £3.90 a metre. I see already that it is the same maker as one of the others, but I will have to work out the cost differences.

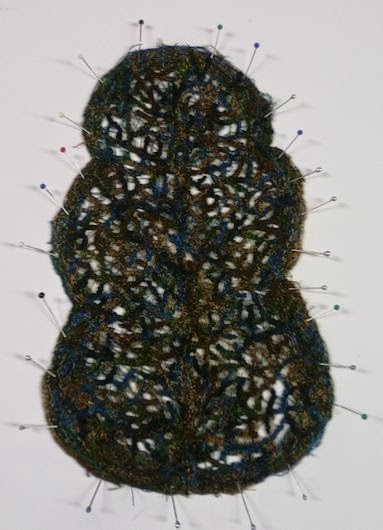
Here is the leafy section of the tree pretty much complete.
This is also a little experiment in abstracting trees somewhat. I am pleased with this one. I wasn't sure where to begin when I sat down to stitch. I hadn't looked back at Meredith Woolnough's work til I was writing this. So, I started going round the edge, then found I wanted to do branches. So, I have ended up with a bit of both.

Now I have to get brave enough to dissolve the fabric. I think I will do that before I stitch the trunk of the tree. Then I can see if there is anything I should do differently.

So, this will be somewhat of an experimental journey, but should also give me confidence to use the water soluble for other things. ...

(Dragons? Of course not! Don't be silly....

Well, yeah.)

Wednesday 11 February 2015

Stitched Trees - 1

If you were around on this blog in September 2013, you had the joy of me filling space with photos of trees around this area. I love trees.

I spent my teen years in 'the back woods'. My sister and I earned money for our further education by working with my dad to clear wood from the grown over areas of our land. These trees were not the big beautiful ones, but young growth. But because the land had not been worked for some years before we went there, many of the 'young growth' trees were only just small enough to put your arms around. (well, a girl's arms.) Being in the woods all day throughout the summers was a wonderful thing, even though it was hard work. (VERY Hard Work!)

We cut the wood into 4 foot lengths loaded it onto an old trailer sort of thing, hauled it back to the area by the house and stacked it. 'Cord Wood' 4ft deep 4ft high and 8ft long. (I was going to link to a photo, but the only ones I found were of split wood.) Then sold the wood to the paper mill...a good portion of that went to pay the driver who brought his truck to collect the wood. So, it was a lot of work and effort, and not much for a result financially.

We also cut birch trees, that were also taking over, and sold that to older people who couldn't cut their own wood. THAT had to be cut in firewood lengths and sometimes split as well!

But I digress...

So, I love trees. While I was doodling the other day, I was sifting through the ideas of what I might do next. I have signed up to the Journal Quilt project again. This year the size is 12x6 in. You must state at the beginning horizontal or portrait. I have chosen portrait.

I had been thinking about shapes, which is why the doodle started with them. But also, when I am in a meeting or something, I do tend to doodle trees or bushes. So, why not trees for journal quilts. I am thinking about looking at 'real' tree shapes and abstracting them somewhat.

I want to do an experiment with cold water soluble fabric. So I can do this first tree on the water soluble.
Pencil drawing of leafy part of tree shape onto the water soluble fabric. wrapped hoop. I laid this onto white foam core so the drawing was more visible.

This blog post was getting long, so I will talk about the experiment and other things as I go along this week.

Tuesday 10 February 2015

About the coffee stirrers

I had a few questions/comments about using the coffee stirrers.

I have used them before on Connected-Disconnected. One of the pieces from a challenge I did with a small art group I was part of. (Well, we still work together, but we started the TVCT group and that used up all our time and energy!)
The coffee stirrer was at the top of a piece with translucent layers. I stitched large beads through the wood to hold the layers in place.

The Connected-Disconnected aspect of this piece was this: The layers were separated by beads, but also connected by the beads.
The particular coffee stirrer used in this piece was painted with wood stain first.

************
For the coffee stirrers in this bead project, I am using a thick pin (I find them too thick for using in sewing, so I use them like nails when I need one! Grin!) and tapping the pin through the wood. First I just make a small dent in the wood with my awl because the pin can scoot out of position and you find you have tapped your hole in the wrong place! I am using one of my older cutting mats to do this on. I stagger the holes a very little bit so they are not going into the same grain line of the wood.
Pin has been tapped in. Awl is making a dent.
The other marks are pencil to show where the other holes need to be.

Then I turn it over, and can just about see where the point came through. Then I repeat the process from this side for all the holes. Some stirrers are a bit more prone to splitting than others.
Pin is poised to poke into the little hole.

With the pin having a fine point, it doesn't force the wood apart too much. and it makes a hole big enough to stick my needle through.
Sometimes there is a little spitting at the end, but if I am careful I can still work with it.
The biggest thing to be careful about is the split having minute splintered edges that snag the beading thread.
You can see how it could split the wood if they were all lined up precisely.

Besides, unprecise actually makes work more interesting...the hand of the artist and all that! Big Grin!

Monday 9 February 2015

Doodle 1

I am in the place in between work... clearing out my head from several months of making and looking forward to work I want to do this year. Over the weekend we had guests, so my head was still rather full.


So, today I sat and doodled for a while, pondering the ideas and which one to begin first.
Try it! I would recommend it for transitions.

Sunday 8 February 2015

And the bead keeps going on...1-7 Feb

Week 5 February 2015

I have always wanted to do something with wooden coffee stirrers. I tried last year, but couldn't find a way to keep them from splitting. But with a bit of patience, I think I have a system.

no.32


no.33


no.34


no.35


no.36


no.37


no.38


You should be able to click the photo to see them better. If not, I will resize them differently next week.