I have started with a selection of colours - dark medium and light - which when together will give the look I want.

I am starting with the lightest piece. It will end up in the smallest bits, so they will be highlights, if you will.

I cut a piece - I am not precise about measurements. You can see from the metric ruler above and the inches cutting mat below and the dot matrix feed paper it is on, that it is about A4/letter paper length. The width was just the width of the offcut!
I put fusible on the back of the fabric with black Misty Fuse. Normally I wouldn't use black under a light fabric, but I wanted subtle texture. I laid it on the paper so you can see the webbing of the Misty Fuse fusible.


Another good tip...let it cool down before you peel the parchment away. It comes away much easier.
Then I cut the next piece which is the lightest of the darker fabrics, and put fusible on the back of it, too.

It is a good idea to leave this fused piece on your pressing surface when you have peeled away the paper because you will lay strips onto it and it is not easy to move it to fuse them down if you do the placement somewhere else!
Next, I began to cut the first fabric into strips 1 cm wide using the width of the fabric. I placed them staggered on the second fabric and with small gaps between each strip. Don't be too precise about the placement. The slight unevenness will help the work to be more alive. Or in art speak - have movement.

or you can make the staggering less abrupt by having strips halfway between.

For this one, I chose the second method because when it gets all chopped, it gives some interesting effects.

At this point, the 2nd fabric has already been laying on a layer of baking parchment on my ironing board, so all I have to do is lay the other piece of baking parchment on top and press to fuse.

The next step is to cut a piece of fabric a few inches wider than this new piece you made and a little longer. I chose the second lightest fabric.

Then fuse it.


And then laid them onto the 3rd fabric (laying on the ironing board so I don't have to move the fabric when I have everything placed.)

I rarely use the pieces on the very end. But on this layout, I cut little bits from that strip to place on edges because the 2nd fabric was a little too wide.


When this fabric layout was fused, I then cut fabric no. 4 a little wider and a few inches longer than the current combined fabric piece. And fused the back of it.

Again, time to slice the fabric, but remembering to go the opposite direction. Stagger the strips on the 4th fabric.

Now fuse them down.

One last go! Cut fabric no. 5 a little longer and a few inches wider than your combination fabric. I cut mine from the back of the crepe back satin...the crepe side 'reads' darker. Put fusible on the back.
Cut the 1cm strips from the combination fabric (no.1-4)

Place them on fabric no. 5 and fuse them down.
And for my purposes, this now is the final fabric!

For ideas of how other fabrics look in this technique, check out this post with images from a couple of my students.
Do you see how interesting this new fabric you have built is? A lot of movement, a lot of texture, and a lot of combinations of the shapes and colours.
I usually use shades and tints of a certain colour, but you can do this with a variety of colours. I wanted to build a fabric to use for a jungle.

You can see how this piece could be developed to show the idea of leaves and shades of the jungle.
There are a lot of places in the steps which I covered where you can say, What if I did this? It all depends on what your final use will be. But for the most part, you need to do at least 4 steps. If you are doing more than 5 steps, you need to be sure your fabrics are well fused to one another in the first few stages. Otherwise, they are tiny when chopped up and can easily begin to come undone.
After cutting my shape, when I fuse it to the backing fabric, I also do a bit of free machine embroidery. The fusing is good, but as it is pieces, could easily get caught on things, then pieces can get picked off.
Trouble Shooting: Do remember though that you have several layers in some parts, so take your time and use a larger needle so it has more oomph to push through. Oh, and if you haven't used Misty Fuse, the glue in the fusible areas of the layers may create their own layers.
It may also mean that because the needle is working harder, it gets hot and you might find the glue melting/sticking to the needle, gumming it up. You can still do it, but you may have to have a handy bit of the hand cleaner gel on a bit of fabric to clean your needle off every so often. You will know! The thread starts to shred! (I haven't tried this, but I understand a needle with titanium coating is helpful in that instance.)
Another idea I have done in the past is to layer the whole with a synthetic organza - free machine it down in a close pattern, and then zap it with a heat gun. Some of the organza will melt away between the stitching to reveal the built fabric. It also creates a wonderful crunchy texture where it has melted.
Let me know if you try this!
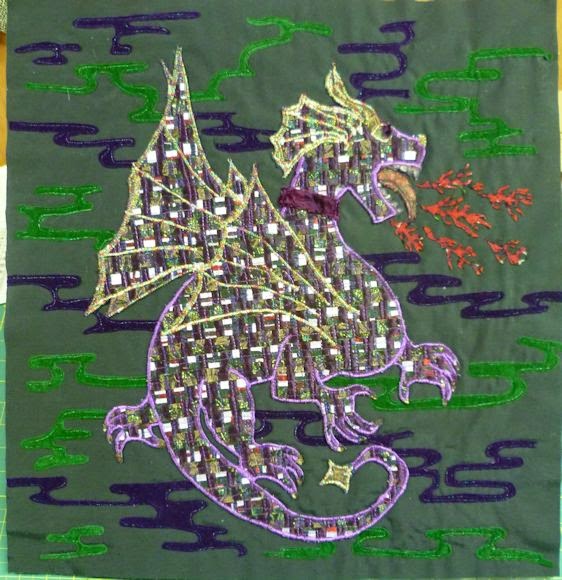
The fabrics below were developed for a dragon. I took part in a challenge to use some very different and unusual fabrics which would not normally be sewn together.
I thought the best way to integrate fabrics which are so unlike each other is to chop and fuse to make them into ...fabric!

brown to purple

to green/blue paisley

to aubergine
and then

lilac (satin showing here as white) to red

to aubergine
This is a technique I have used in the past for things like this moon. (inside back of the Midnight Dance coat)

It makes it look like you spent ages piecing!
So with much chopping and adding of a few fancy fabrics of my own I have two pieces of fabric that should work together. They need one more chopping and then blending them.

Final version of the fabric I made by chopping an fusing. However, this is not fused at this point.

I wasn't sure the two fabrics I showed the above would work together, but they blend very well because of the aubergine colour fabric they are adhered to.
As this was being made to cut out a dragon, I layed the dragon onto the fabric and adjusted the strips so the dragon could be cut from it. I had to shorten some of the strips where the width wasn't needed and use them to extend the strips where it was needed.

And then I fused the strips down and prepared to cut out the dragon image. Because it was freezer paper, it can have a temporary hold enough to keep pattern on fabric while it is cut out. In other situations, I might reverse the image and trace it to the back of the backing fabric, and then use that for the guide to cut it out.
And here is what the dragon looks like cut out.
I rubbed out the background he was on so you could see what he looks like on his own.

He needs some definition. I have stitched him to felt in a grid pattern to hold the pieces together better. I used a toning rayon thread and it does not distract from the bits of fabric.
Here he is with a little work to give definition and to help me know what I need to do next for him.

Please disregard the eye. It needed more thinking!
In this image, I am in the midst of the outlining using a zigzag.

And the final dragon, needing a binding on the edge.
If you make a dragon, send me a photo!
No comments:
Post a Comment