I have photographed the steps at various points of making the different beaded O rings, so the blue beads shown may be different, but the step is the same regardless.
What size ring Determines how much thread:
I have been using approximately 72 inches (120cm) of Nymo beading thread doubled through a very fine beading or milliner's needle. (thread needle and pull till ends are even and tie a knot.) the amount depends on the size of your O ring.(I can get my O ring on my pinky finger, but not my ring finger, and I have small hands.)
Beginning to add beads to the ring:
Basically, you attach your double thread to the O ring by putting the needle through the loop and tugging through...like a blanket stitch.


For the first row, load one bead onto the thread.continue to do the blanket stitch, but slip it through the bead, rather than a loop of the thread.


Finish that row by coming up through the first black bead.

For the second row, load 3 beads onto the thread. I used translucent red beads. Skip 2 black beads and go into the next black bead. pick up 3 more red beads, skip 2 black beads and go into the next black bead.
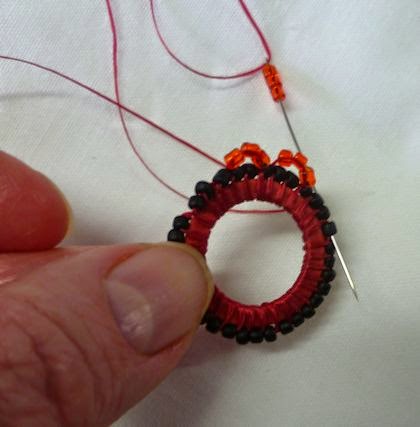
Basically, you are adding 3 red beads before putting the needle into the 3rd black bead along. You will be stitching through these red beads sometimes 2 additional times as you do the rest of the rows. So, bear this in mind when you choose your beads for the row. If it is too small, you won't be able to make the needle go through so many times.

finish the row by coming up through 2 of the red beads in your first arch.
It is worth going along from the start of your red row and tugging on each arch to snug up the beads. It means you use less thread and the end product is not so floppy.

For the third row, load 7 beads onto the thread. You may choose to use five, but the points won't be as pronounced.

Each time after you load on 7 beads, go into the middle red bead of the next arch.
You can mix and match beads for the third row, as I did for bead247 as this is the featured part of the end product.
 There were not enough of each bead to do a whole ring on their own, so I worked out a pattern using them together.
 But, for the regular pattern, I used 3 blue beads then 1 size 15 red bead then 3 more blue beads.

As you progress, the arches will take on a more pointed look.

At the end, you have just stitched through the middle bead on the starting arch. finish the row by going down through the next red bead - the 3rd one from that red arch.
Again, it is a good idea to go along and tug on each point to snug up the beads.
The fourth row is an anchoring row. You can leave it out, but I find it helps the whole piece hold together well.

For the fourth row, you have just come down through a red bead on the first red arch. Pick up a feature bead (or a separate colour altogether if you want to have 4 colours in your product.)
Then go through all 3 red beads on the next arch. I find it easier to go through 2 and then through the 3rd because the needle is straight and the arch is...well...an arch!
Carry on doing this to the end. What you are doing is anchoring the row while you are adding a feature bead between the arches of the second row.
I suppose you could do this whilst doing the second row, but as I say, I find it anchors things to have the thread passing through the second row an additional time.
When you have inserted the last bead between the arches, you will probably find you can only go through one bead on the following arch because the other 2 beads already have passed through there several times. So, go through that first bead of the arch, then go down to the first row and stitch through several in that first row to anchor the tail.
Sometimes I go forwards, sometimes backwards, depending on how much thread I have left or how secure I think the tail needs to be. Point your needle through to the back of your product and tie it onto one of the stitches showing at the back. You can pass it through one or two more first row beads, working from the back or under several of the stitches showing at the back before snipping the thread. Again, it is down to how secure you want it to be or whether you are concerned about the back of the beaded ring showing.
How Many Beads Decides your colour choice:
For my project, the blue beads were the feature bead...what changed every time. It kind of depends on what you have decided to feature and how many beads you need.
Example: For the size of O ring I used, I found I needed 33 black beads. Which then meant I made 11 arches of red beads - or 33 red beads. and then I needed 11 bead combos for the points - 11x6 blue and 11 size 15 red. and finally for the anchoring row I needed 11 blue beads. So, at the end of the day, I was using 11x7 blue beads - 77 blue beads each day. If I hadn't used the little red accent bead, I would have needed 88 blue beads each day!
So, keep that in mind when you are thinking about size of O rings or curtain rings. You will need a good size packet of the feature bead or else you need to plan, as I did, to change the shade/tint of your featured bead.
If you are doing this for a whole month, You also need something like a 25gm bag of the 1st row beads and of the 2nd row beads because you use 33 of each everyday for the month.

This bag was full - 25gms - when I started and now it is 14gms.
And altogether adding up those numbers it was 154 beads for making one beaded ring each day. It didn't seem like that at the time! So still some planning if you are only going to make a few of these and do something like turn them to earrings.
Note: Most of the beads I used were seed beads. If your beads are a little larger or if your O ring is a different size, you may have to adapt the number of beads you use in a row. Some of the rings where I used larger beads are a little tight and don't lay flat. Perhaps I could have done rounds with multiples of 10.
And there you are! Let me know if you make any of these.
No comments:
Post a Comment