Tuesday, 30 September 2014

Blue sheath dress

Okay. I have everything done (that was in the line up the other day) but am sewing buttons. I am Not staying up to sew buttons, especially since I have a blood test at twirly o'clock in the morning.
I will try to get a photo of me wearing it to add to this post tomorrow.

You can see all of the things others have made for the contest here. The one who sews the most yardage wins. Most people aim to just add to the group total. So, this is the one I have added to the contest...it doesn't have buttons.


Some people try for a personal goal. I set my goal as 15 yards. As soon as all the buttons are on, though past the deadline, I will have met my goal. I will recheck the actual amount then. Though not finished in time to add to the contest, I feel I have personally won on this one because I now have a wardrobe of lovely, well-fitting clothes for warm weather that I have made myself!

Here is what I wrote in the review.

Pattern Description:
Sheath Dress - side bust dart and minimal waist shaping. An A-line to the skirt area.
This version has cap sleeves and a slot opening at the neckline

Did it look like the photo/drawing on the pattern envelope once you were done sewing with it? Self-drafted
I have made this before, but with long sleeves, which I haven't worn because I didn't really like the look (with long sleeves) on me. So this time I have done cap sleeves.
The other dress had textured fabric, but reads as a solid colour. This time I used an African print, which looks much cuter.

Were the instructions easy to follow?
Yes. The neck opening on the other dress was a bit floppy, so I changed the way I constructed an opening for this one.
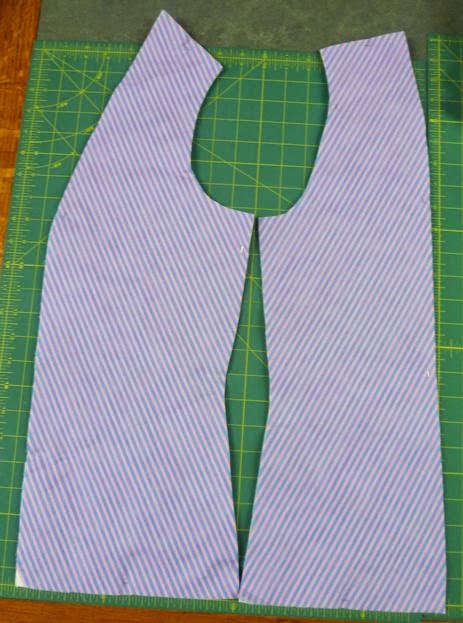
I made up a facing for the neck opening which goes right across to the armhole and to the shoulder seams.
I placed RS together (facing and dress piece) and stitched on both sides of where the opening would be and across the bottom. Then slit down the CF line and into the corners and turned it through.
neck opening
I found this to be an easy way to have a sturdy opening without a lot of bulk.

What did you particularly like or dislike about the pattern?
I found that this pattern works better on my figure with an interesting fabric, and especially with a print design that is vertical.

Fabric Used:
African batik print made for kaftan like garment...central print mirrored on the back. also a border print. I have had this over 20 years!

Pattern alterations or any design changes you made:
Besides a better construction for the neck opening, I changed things at the hem to allow for a border print. So, it meant that where the A-line part of the hem usually curves up at the sides some - to accommodate my large bottom and make a straight hem when it is on me - for this I changed things so the hem is straight all around altogether and the border pattern matches.

Would you sew it again? Would you recommend it to others?
Yes I will sew it again and use a visually interesting fabric. I may do some embellishment on the previous dress to make it work better (as well as shortening the sleeves.)

Conclusion:
I have wanted a sheath dress for my wardrobe because you can just throw it on and accessorise. Most accessories would be lost with this print, but it could be dressed up or change the look with choice of cardigan or jacket.

Monday, 29 September 2014

SAQA Benefit Auction

The SAQA Benefit Auction has been taking place the past couple weeks. You may recall I donated one of my Ramshackle pieces last year, which was displayed and sold in Houston.
Today the section with my donation for 2014 goes up for auction. I put together a little explanation about the piece for the SAQA Europe and Middle East blog, so I decided to also post the info here.

Ramshackled Houses

My piece for the SAQA Benefit Auction is a continuation of my ‘Ramshackle’ series in which I have been exploring Neighbourhood. I have been using houses with a sketchy look to develop the character of a particular neighbourhood.

Past works in this series have explored proximity and positioning of houses. I found I could show estrangement or togetherness, depending on the lean of the houses and the placement of ‘accessories’ like a path or smoke from the chimney.

Along with these ideas, I am exploring colour. Does the fabric used as background contribute to the mood or relationship of the neighbours? For instance, in Ramshackled Houses, I haven’t added paths, but I think the green gives a pastoral feel and a sense of companionship.

To see some of the other pieces in this series, you can click on the label "Ramshackle" below this post.


Making the work -

I seldom sketch before working, choosing rather to develop the ideas in my head and then work them out in fabric. But for my ‘Ramshackle’ series I make a little sketch of what I have in mind. It helps me get a better feel of the positioning of the houses.

sketch


To make the Ramshackled Houses I used printed cotton fabrics. The top layer was fused using Misty Fuse before cutting the shapes and positioning them over a dark fabric.

When everything was arranged to my satisfaction, I fused the pieces into place. After this was the rest of the quilt layers, securing the pieces with straight stitches along edges, further quilting through the layers, and lastly the binding.

And the finished Ramshackled Houses piece I sent to SAQA for the Benefit Auction.


This quilt will be up for auction in section 3 of the Benefit Auction, which begins today.You can also follow links there to see what work was donated for Section 1 and 2 and the work which will be displayed for sale at the IQF show in Houston.

If you would like to see more of the work made by members of the Europe and Middle East region, you can go to our region blog.

I am not exactly one for slogans and dunning for money, but this is what SAQA has been adding to their notices about the donation pieces.

Help support SAQA, and at the same time build your art quilt collection by bidding often!
(Or my version: Just go look at it!)

Sunday, 28 September 2014

"And the Bead Goes On and on..." 21-27 September

2014 - Week 39 Daily Beads

no.264


no.265


no.266


no.267

almost black centres to these dk turquoise beads

no.268


no.269


no.270

triangle beads that are a beige rubbed to show blue at the edges.

Saturday, 27 September 2014

Something on Saturday

In the post today
Kindly sent to me by Lin Hsin-Chen in Taiwan just because I connected her with someone else who could answer her question better! Thanks Hsin-Chen!

The art quilts in the book are fascinating. The type of fabric which seems available in Taiwan (or at least to those who made work which is featured in the book) is quite flowery, but they seem to be able to 'paint' with that fabric like we would hand-dyes or batiks, and the resulting look doesn't come across as flowery.

Most of the artist statements are translated into English, so you can get an understanding of the intent, even with some of the issues that can come with translating.

There is a large section where the artists from Taiwan, Korea and Japan made work and then sent to each of the partners in the other countries (one from each country) and back home again where it was finished off.

As is often the case with this type of Round Robin, you can see some where the changes made the work stronger and others where the originator/finisher tried to bring back some sense to the piece. I would have liked to read the rules in English, since it looked, in some of the cases, like one or both of the partners made a complete new section which was then left to the next one to incorporate...or not.

But any way, it made fascinating reading material for my lunch break!

Friday, 26 September 2014

While I was at it...

I have been working on facings and collars, etc. But while I still had the off white thread on the overlocker, I decided to cut out and sew up this one.
not so grandmotherly!

So, yes, I might not get all of these done by the end of the month, but I can work on them a bit at a time. The trouble with assembly line sewing is that it takes a while to get one finished. But then the rest come quickly behind it.

And tomorrow's list involves binding necks or finishing collars. and hopefully finishing the variety of sleeves and maybe hems. Buttonholes on Monday.

Wednesday, 24 September 2014

In the line up for this week

Plus one cut out on the table. For the Fabric stash contest...I will sign up as soon as I get one complete.

I have stopped to put the white contrast on the centre one, and the collar on the turquoise paisley next to it. Because the overlocker is loaded with off-white. Then I will switch to black.

Here is a question. Do you think the bright turquoise next to the red would like off-white overlocking or black? Not that it will actually be seen...

the bright ones will be sleeveless and replace 3 faded RTW tops in those colours that I seem to have worn to death.
The dresses are for very hot summer days when you just want to throw something on that is not restricting.

I have cut sleeves from the blue part of the scraps for the African batik. But looking at it, I might leave it sleeveless. I need to make a facing and cut a slit for the neckline because at present I wouldn't be able to get it over my head. The back has the same print as the front.

I am afraid the seer-sucker stripe at the right end is a bit grandmotherly. So I am trying to think of something to cheer it up, which is why the blue bit in the neckline. The buttons are just stuck on with pins for now to see if I really want them on the dress.
Oh! perhaps the blue eyelet trim I have used on other occasions will work for cheerfulness. do I have enough?

Tuesday, 23 September 2014

oops!

I am surprised this doesn't happen more often!
Which prompted a bit of sorting. So now the bead boxes are in the drawer one up from the one you see.

The previous bead drawer is full of things like the sequin box, the 'pearls' box, and the containers and wee plastic bags of things to bead onto...like the rest of the O rings.

Giving me a bit more space on the bead station.

Well could do with a bit more sorting I guess!
*************
That was yesterday.
Today I am sewing the things I cut out over the weekend.
Watch this space.

Sunday, 21 September 2014

"And the Bead Goes On and on..." 14-20 September

2014 - Week 38 Daily Beads

no.257


no.258


no.259


no.260


no.261


no.262


no.263

Saturday, 20 September 2014

Something on Saturday

I don't think I showed you this one.

The sunset on the top of the tree behind our back garden. It was amazing how it made the top glow.

Friday, 19 September 2014

Blouses - done! part 4

Blouse no.4 also has collar stand as a stand collar and sleeves have been shortened. But the main feature of this blouse is the colour blocking using turquoise printed and plain fabrics, basically following the main pattern pieces.
The fabric used is fat quarters from Fairtrade Fabric.

Detail: There is a pleated strip of fabric added to the bottom of the back panel referencing the current peplum look. The sleeves also have horizontal pleats for subtle interest.

no. 4 The front and back pieces of the princess line pattern are a bit longer than the sides due to reaching up to the neck area of the shoulder, so I couldn't get the whole piece cut on a fat quarter. So, I opted to add a bit more colour blocking at the bottom of these pieces.

I had enough scraps from the turquoise dot fabric to cut the front pieces, but not enough to cut the back piece on the fold. So, I decided to have a seam at CB. This meant I could cut a wider piece, so I chose to pleat it in such a way to disguise the seam. I also added one more pleat on either side. So, basically I have added a pleated piece of fabric. But the result is something that alludes to the idea of a peplum without adding too much attention to my backside!

Possibly not the most flattering blouse, but it will be fun to wear on summer days just because!

Thursday, 18 September 2014

Blouses - done! part 3

Blouse no.3 is turquoise dot cotton. I used the collar stand as a stand collar. Sleeves have been shortened. Flat self trim pieces have been added. Most of these have the addition of a decorative stitch using turquoise cotton thread.

Detail: Flat self trim added in different ways a. as different length decoration on front b. as decoration on collar c. as inserts like flat piping in sleeve hem and button stand.

I haven't done a sleeve hem like this for some time, so it took a while to remember where to stitch and where to turn so everything comes out in the right place. I hadn't intended to add the decorative stitch here, but when the rest was done, I realised it needed to be on the sleeve to pull it all together.

The turquoise dot cotton fabric is more tightly woven and I found it very hard to ease the collar onto it without a lot of unpicking of accidental pleats. I had no problem with this for the other cottons. But the result for the blouse is a nice crisp feel.

Wednesday, 17 September 2014

Blouses - done! part 2

Thanks for the comment on the white blouse. I have gone through the wardrobe and got rid of 4 white Ready to Wear blouses, none of which managed to fit comfortably at all! Yet I put up with them for years!

Blouse no.2 is blue and pink stripe cotton. The collar and stand, cuffs, and button stand are in white cotton.

The side panels of the front and back princess pattern have been cut on bias and sewn together to create a chevron. I showed that the other day, but here it is again.

Cutting the stripe on the bias was not so easy because there was not enough to get it on a 45 degree angle. I ended up with 30/60 degrees (depends on which way you think of your angles!) This still worked to create chevrons at the side seam.

Detail: as well as the angled stripes and contrast sections, I used a selection of buttons in different shades of lavender colour. The blouse looks lavender at a distance because the dusky blue and dusky pink blend visually.
They were from one of the mixed packs I got at the Festival of Quilts. There were just enough of the ones with words on (like Tommy Hilfiger) to be able to use for the blouse. Each one is different.

I like how it creates a unique feature; basically because they were the only buttons I had that were anywhere near the colour!


Tuesday, 16 September 2014

Blouses - done!

Recovering today from going all out on finishing the blouses for the end of the contest!
Assembly line work has its plusses, but then again, it is not always wise. I was still sewing buttons at 10pm, then doing photos, then processing them, then writing the reviews. VERY LATE. But they were in by the deadline - midnight east coast America.

Somehow I need to learn better how to gauge the length of time things take - and add on the other things I do to that figure!

If you want to see what others have made, you can go to the Gallery for the One Pattern, Many Looks contest.

Here is the first one, made from white on white embroidered cotton I got when the Offcuts group went to Goldhawk road last year.
front
back

And a bit of detail. I used flower shaped buttons I bought from The Button Lady last year at Festival of Quilts.


I will post about the others during the rest of the week while I get my head together on what (out of plenty) project to do next!

Sunday, 14 September 2014

"And the Bead Goes On and on..." 7-13 September

2014 - Week 37 Daily Beads

some of the beads this week were a little bigger. A little different in overall look, but not too much.

no.250

This one is a pale aqua that shows colour more obviously in person.

no.251


no.252


no.253


no.254


no.255


no.256

Wednesday, 10 September 2014

adding trim

The turquoise dot blouse is getting a bit of trim here and there. I had thought of frilly, but decided against it. So, we will see how these flat bits turn out.
I am stitching them down with a simple pattern stitch on my machine.

Tuesday, 9 September 2014

It's in the details

One of the blouses I am making is from fat quarters of fabric from Fair Trade Fabrics.
The front panels and the back panel (cut on the fold) are longer than the side panels because they go right up to the inside neck on one side. So, that made it difficult to cut from a fat quarter. I decided to carry on with the colour blocking and add a bit to the bottom from the turquoise dot fabric I am using for the other blouse.
For the front panel, it is just added in and cut making up the missing part of the pattern. But for the back panel, since it is cut on the fold, I hadn't a big enough piece from the scraps to cut out a piece without joining it in the centre. If I did that, I had enough to do something interesting.
I decided to pleat it in such a way as to hide the centre join a bit, and then just one more pleat to give it a false peplum look. I sure don't need great ruffles and peplums on my backside, but this gives a bit of interest referring to current style while still working for my figure.

The added piece then gets a bit more control when sewn and pressed. and even more when joined to the side back panels.

I got the sleeves on this blouse and the turquoise dot blouse today. Not much more because I also had a request to hem jeans for a Certain Young Man. They were also a bit too wide, and I tapered them in at the side to the hem. He looks very good in them now. Because they were cream colour, it was a lot easier to stitch the hem and make it look like original.
Sorry, I didn't get a photo.

Monday, 8 September 2014

Blouses

The past few days I have been working to sew up the blouses I cut out earlier in August.

So far I have all the vertical seams (and shoulder seams) done. And the collars, cuffs and button stands interfaced.
and now I have the 2 with long sleeves nearly finished.
left: pink and blue stripe with contrast collar, cuffs, and button stands.
right: white on white embroidered cotton

Up to the point of needing the hem and needing the buttonholes and buttons.

The side panels of the pink and blue stripe are cut on an angle, so that the underarm seam has a chevron effect.

Sunday, 7 September 2014

"And the Bead Goes On and on..." 1-6 September

2014 - Week 36 Daily Beads
I am going back to posting Sunday to Saturday results rather than Monday to Sunday. The weekends are too busy to do 2 on Saturday - which is what I was doing in July and August - or to post later in the day on Sunday.

I am working with O rings this month. I had thought about something a little more complex, but soon realised I had too much on at the end of August and beginning of September to develop a different technique. ...and since plans look like I will be busy throughout September, not really a good time for something more time consuming!

So, O rings - these are red. I almost went with white beads, having white in my head from the beads I did for Karen Ruane, but decided on black beads instead, as I haven't worked with it much. Red and black go well together. I also decided to add blue to the colour combination. The blues will range from the greenish side of blue through to the purple side of blue.

I will post about the making up later in the month. But it is the same technique used for the star washers, curtain rings, and paper clips.

no.244


no.245


no.246


no.247
a blend of 3 different blue beads. There were not enough of each bead to do a whole ring on their own, so I worked out a pattern using them together.

no.248


no.249