Some time ago, a friend was doing crazy quilting and became involved with a project called Take A Stitch Tuesday run by Sharon Boggon, who is well known for her online stitch dictionary of embroidery stitches. I was doing other things at the time, but I always kept it in the back of my mind to try. However, Sharon hasn't run this for some time.
Lately I have been really inspired by the stitching that Linda McLaughlin does...so, I have been playing with different ideas on how to do a bit more hand embroidery. Linda runs one of her series from her birthday, so I thought that might be a better place to start, than the beginning of the year when I seem to be very busy with the new year bead project. As part of that, I went looking for Sharon's stitch dictionary and signed up for her newsletter.
And...just about the time I was going to figure out how to make the year of embroidery stitching (but not every day!)happen...Sharon posted that she was running TAST - Take A Stitch Tuesday again! The site where the stitch dictionary is located has become very much in need of rebuilding or something, so she is transferring the stitches over to her Pintangle site.
The best advice I have heard about daily or weekly stitching projects is from Kathy Loomis who advises trying something out before the actual start. Then you can work out time issues or even whether the goal is manageable before you get to the point where you would feel you were letting the side down if you gave up. (No, not the exact words, but the principle is there.)
I started to see what to trial these ideas on and found my 'Slow Cloth' looking at me from the desk near my sewing machine. (Just realised I started this in August 2009!) Made up of 3 layers of rust dyed muslin with some small green muslin 'patches'. and then doodling on it with embroidery.
This was the 'Slow Cloth' before I did a lot of embroidery in the blank areas around the blocks.
I had got it to the point where I thought I did enough in the majority of the background, but was really stuck on what to put in that larger rusted spot.
And here is where TAST comes in! Sharon is basically reposting the original list of stitches. So, the week 1 was fly stitch.
I looked at the 'Slow Cloth' and realised I hadn't used fly stitch yet...and that it would be a great stitch for the large rust spot.
So, I have made a start using the fly stitch in a similar way you would do seeding stitch. I am thinking I will eventually fill in the rust spot, but starting with a thicker thread and working upwards with increasingly thinner ones so that it will look 'lighter' in the top part.
And to integrate these new stitches, I am adding stitches in some of those same threads in other parts of the work.
week 2 was buttonhole stitch
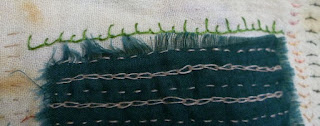
green thread irregular buttonhole stitch above the patch
and here with some random straight stitching changing the feel
and here with some random straight stitching changing the feel
week 3 - (today) is feather stitch)
Somewhat feathery, but I wanted to make it wander like some of the other trails in that part of the piece.
What the 'Slow Cloth' looks like now. If you scroll down through the 'Slow Cloth' posts, you can see some of the previous stitching close up.
Sharon says "The challenge is for new hands to learn the stitch or if you are an experienced stitcher take the stitch and push it a little further in a creative manner."
Now that my birthday has come, I want to do the stitches in that more creative way each week on a project. Not the 'Slow Cloth', though now am unstuck with this, it can be the 'stitching while watching telly' project.
But for now, this post will stand for the first 3 weeks.


1 comment:
A lovely piece to start your TAST journey with.
Post a Comment