Showing posts with label Problem Solving. Show all posts

Monday, 14 January 2019

24,000 technique explained.

Questions answered... Fabric size near the end of the post.

Stacks
This is day one, I used what I call stacks.
There is a small sequin at the bottom where it touches the fabric. I find it just adds a bit of grounding. and overall, glistens in different ways when the fabric moves.
I used 4 beads of one colour, 2 beads that create a contrast and then 4 beads of another colour...making 10 beads! The 2 different colours with 4 beads each are strung in different patterns for each set of 8. On the stacks, the 2 beads of contrast are used as stop beads at the top of the stack.

Each set leaves the centre open for now. So, there are 8 stacks each with 10 beads!
This set makes the centre of what will be a 9 patch.

Arches (formerly known as humps)
Then Day 2 starts the sets of arches. Going around the set of stacks.

Each arch starts and touch down in the same square. If you look at yesterday's post, you can see that I have been doing a bit of playing with the direction they point. But I will go crazy if I make that a Rule!
I am not going to get bogged down when it comes to using the same kind of bead or even bead pattern somewhere else. after all I am recording 24,000 People!!

Reminder of 5 sets done...it makes the shape of a plus or a cross.

The centre one is not so easy to see because the stacks splay out.

Reminder of 9 sets, which makes one big square.
What I did to fill in the corners, was to swap the size 15 beads. Now shiny light green becomes part of the main arch and the opaque blue becomes the contrast. It is not easy to see, but I have always found that with patterns on a small scale, it gives more interest from a distance if you change things about. (Like this... my dog is black, but when you are closer there is auburn tips that show in the sun and brown hair amongst the black ones.)

For the moment, I am using more of my size 15 beads because I have had them for ages and they never seem to run out! But I don't expect to only use the combo of 2 types of size 15 beads with 1 type of size 11.

And finally,
Fabric
an idea of the size of the squares. It is almost 2squares to 1/2in, but not quite! or 2 squares to 1cm, but not really. 😬

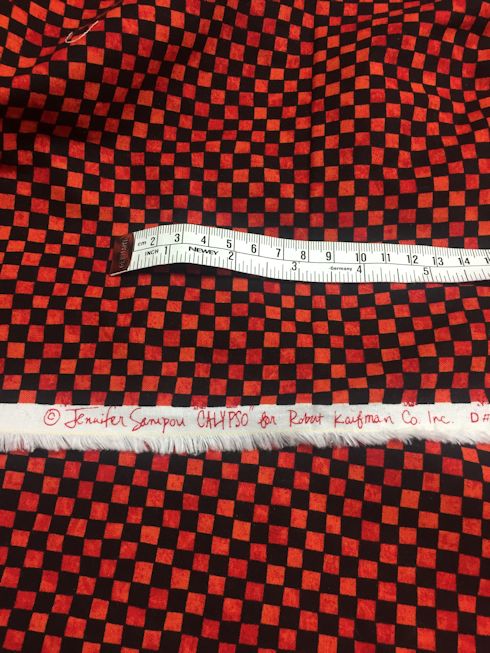
Approx. 41-42" (104-107cm) long (it isn't cut straight!)
42.5" (108cm) wide

Wednesday, 2 December 2015

Workstation swap

The past few days I have had a headache. But I have actually done something which should help with production and pain around here.

I swapped the bead station to the sewing machine station and the sewing machine to the bead position.

It occurred to me that A- I get far to much pain in my shoulders trying to sew with the extension table, because even with my chair at the highest position, I was more or less having to move fabric around with my whole body, rather than hands and arms.

B- Because I have reading/sewing glasses which I use for beading, I was bending over to see the beads when I select them. And doing this for any length of time was causing my neck to hurt.

So, as above, the sewing machine is now at the right height to sew plus has the benefit of a slightly bigger space to the left and there is also the table at the back for extra support if need be.


And all the accoutrements which were accumulating for beading and embroidery had become very cluttered on the small table and drawer unit. Now there is plenty of room to organise them and still have an area at the front to bead at a reasonable level!

Um...possibly moving the drawer unit on my own was not such a great idea...thus the headache.

Still, I have now been able to get a good start on the sewing on wax paper project. I pull out the top drawer of the drawer unit and put a board over it. So, then I have something to keep the wax paper under control while I hand stitch.

Monday, 21 September 2015

oh...orange sequins

So this month the daily bead has been using orange sequins for the little bits in the centre of the 'booklet pages'. I didn't have a great deal of these but I thought I had enough for the month.

Oh, but only enough for 4 more days.

So, what to do?
I didn't think any of the options in my sequins case would work. Either too red or too big or too something else.
So, I looked at sequins online. Well. not too expensive. One place online said around £1 for a pack of 250 or so. But I don't normally use orange - at all. So, just for 6 x 12 sequins...not worth it. Especially as they need you to buy at least £5 worth of goods. Okay, I can easily buy £5 worth of sequins! But at the moment, I do not need to start building up my sequin collection! I might buy a pack of orange sequins at some future date at a show if I see them.

New thought, what about punching holes in an orange bag?

Orange bag with holes

holes punched

oh...just a bit too big.

so stack them on a needle to trim them.


but when separated, they still were just a bit too 'not right'. (Besides having jagged edges!)
So, a bit more digging. probably a gold one is nearer.
I have settled on the lighter gold ones to the left. The photo seems to show the ones to the right look closer, but in real life, the others are closer and not as thick.

So, if I have done my sums right, I will combine the light gold sequins and the rest of the orange ones. I think I can do one orange one on every 'page spread'.

Watch this space for next Sunday to see if it worked.

But I haven't thrown away the punched holes. You never know...
and the mind races furiously into the future with ideas for using holes punched from plastic bags! I will get a sharper punch though!

Saturday, 5 September 2015

blouse time

Taking a little time out from projects to make a blouse.

I am trying the option of bound seam allowances, but doing it at the very beginning instead of after sewing the seam.

One reason is that I wanted to try a slot seam in the princess seam...with the addition of the slot bit having a little godet effect at the bottom.

It has been challenging! Not the least that I seem to have done the slot construction sequence the wrong way round. And trying to do bound seams as well!
But I have done it and learned from it, and that is what counts.

So, all but shoulder seams are sorted now and the next step is to stitch things together. There will be other white accents, too.

Thursday, 27 August 2015

Chopping and Changing

Before I get tucked into this next project, I have taken a few days to sort out changes with some of my summer things.

This blouse fits, but with the horizontal pleats, it is far too snug on my arm. The pleats didn't actually show much because they lined up so well with the plaid.
So, I unpicked the top pleat and cut it off just below the folds. I was concerned it would still be a bit snug, so I had a good think.
chopped off bit to the left - mini godet on the sleeve above right.

I made a little godet just at the centre of the hem on the outside of the arm using a section of one of the chopped off bits. So, still a little detail, but easier to move my arms!

Another problem:
This dress never seemed to be the right thing for the current weather. Too hot in summer with the long sleeves and too cool in the spring because it is rayon/linen mix and very light weight. I never ended up choosing it, or if I did, I regretted it!

So, I chopped off the sleeves. Already better.

As I thought, I can fit my cap sleeve pattern on the length!

And so here we are.

The difference in the way the grain lies is not a problem because it is cap sleeve anyway, so is only required to cover the top of the arm.

So, guess what else is getting that treatment?
I have never actually worn this yet!


Other things I have been sorting include taking shaping darts out of some of my summer blouses.

Including recutting sleeves for this. As for the other blouse, the decorative bit has meant the sleeves are now too snug.
But instead of doing changes like the blouse sleeves above, I have leftover fabric, so I can recut a cap sleeve.
I do hate that I have gained weight with this health thing, but I may as well do something to get some clothes I am not ashamed to wear again!

Who knows, maybe next year I will have to do this all again because I am back to the original weight for when I made it? But at least when it comes summer again, I won't have to try to find clothes to fit.

Saturday, 18 July 2015

repainted

A few months ago a friend asked me to do a makeover on her t-shirt.
She didn't like the blingy look of parts of the screen print.

I forgot to take a photo of the whole before I started, but this is where I decided to start.
I thought by starting here, I could workout whether I could actually paint over with fabric paint while still retaining the screen print look.

So, here is that section repainted.
At first I was going to do most of the gold bit there. But after the larger parts were painted over, I realised that the black came forward and the gold receded. Up close you can tell the painting, but from a distance, it looks like it was meant.

So I proceeded to the largest part on the main print. Here it is with the large gold bit covered by black.
You can imagine what it looked like with that bold motif shining solid gold paint. Some people like bling, but for my friend, the result is much more tasteful.

I was concerned that because the fabric paint is sitting on top of gold paint, that it might get stretched - for instance if it were across the bosom. But the placement is fine, and the paint should be stable for some time if she washes it turned wrong side out.

My husband saw the finished t-shirt laying on my worktable. He (of the school of Never Draw Attention to Yourself) said. "What did she think was wrong with it? It looks fine to me."
So, that was confirmation. He agreed that to have the large motif gold would be a bit too much!

Thursday, 2 July 2015

Okay back to the garment from the broken internet saga

Thanks so much for all the lovely comments. It is very encouraging!

I went missing due to a broken internet. or a bust up between my computer and the internet or something, because A Certain Young Man and The Thoughtful Man both had internet connections. So, Mr Thoughtful has been on the case and seems to have sorted things.

So, lets see. We were talking about sleeves only being pinned on and one not quite wanting to look like the other.

I stitched the sleeves on by hand, after spending time getting them both to hang similarly. I tacked them in place under the bodice part of the armscye. Then I turned under the edge as I went along stitching them with a sort of pick stitch. Sort of, because I didn't attempt small evenly spaced, just the tiny backspace when I did come to the top. Then afterwards, I went along on the under part of the seam and trimmed away the excess.

But the hem edges of the sleeves were not wanting to resemble one another well. This was because of the angle of the flower motifs in the lace. I tried to trim round the motifs a bit for them to make an interesting edge. But because there is a lot of open space, that left the net ground between looking rather raggedy. Eventually I trimmed them both straight and did a narrow hem.

Yet, not at all as pretty as I would have liked. SO, I decided to try individual motifs arranged over the hem edge.

and that works for me.

I have been playing with the embellishment bit now. Not much accomplished today though, as I started out with a very bad head, so gave up, took a migraine tablet and went back to bed. (moving bedroom furniture in 30 degree C weather yesterday may have had something to do with it...I 'know' I can't do that without the result, but the result doesn't come til the next day, so I forget to stop before I have done the damage.)

Anyway, I will show you some of the trialing and sampling tomorrow. Internet providing, of course!

Monday, 29 June 2015

Apologies for the delay

Saturday was a long but productive day. So the next bit of the story has been delayed.

Anyway.
When I was looking for something to make the gown special, I decided to look one more time in the cupboard of shiny/special bits. I thought I had looked at all the purple or pale sea green.
And there was a bag of lace scraps! My friend has an alteration business and these bits came from a prom gown she had made. When the scraps were offered, I knew there would be a reason for them at some point in my life.

And so.

I tried out a few ideas and loved the look of trimming. There was a good length of scallops I could use.

I tried out motifs scattered, but that wasn't it.

So, I laid a length across the back just to see what might happen.
OH yeah! a little bolero.
Too exciting to photograph, I got right onto it.
Do you spot the problem? Not the bit at the shoulder of the front pieces, that was me by-passing several steps, but getting rid of the darts.

The Problem? In trying to be sure I was cutting the lace so that the motifs were going to be on the right level, I ended up cutting 2 fronts!
Oh dear. That was all I had for a big enough piece to cut - or at least if it was not aligned totally differently to the rest.

But I managed to cut it almost the same and patched a bit onto the area under the arm.

So, that is what I was doing late Friday night.
Tune in again tomorrow for more in this story!

Thursday, 25 June 2015

a bit more progress

The patching continued and here are the front panels pinned up.

Then after a bit of an auditioning process, some plum/lilac metallic threads used to join the fronts.
You can see how the shaping for the bust has come together. It took a bit of smooshing of the right patch because it had nearly an angle. But it worked.

And the first side front joined up.

This was not without much headache because one of the chosen threads is not coming off the reel as it should, so there is a lot of rigging of stands and all sorts which only seem to work for part of the time. Still I am trying to get the fronts done, and then I can change it for something less temperamental for the backs!
But, no photos because I do have some pride...I don't want to show you the jumble that is at the side of my machine! But, generally I can find what is there, so it works for me.

NEXT: considering what will turn it from a gown of patches to a gown to show and cause that draw in of breath that I look for when the model comes out onto the runway.

Tuesday, 23 June 2015

more sampling

Well, I had thought I would be done with the zigzagging. But I still have at least a day's worth to go. The shoulder was limiting me a lot.

But, as I said in reply to Kathy's comment yesterday, I was starting to get to the point where I really didn't think this whole joining back together thing was going to work!

So I took time out to find out if it would.

I had thought to do 'faggotting' or 'bridging'. a Heirloom sewing technique sometimes used in garment making. This tutorial shows how to do it by hand. You can also do it with the machine. I have little spacers that fit my machine. But I couldn't find the instructions. and to tell the truth, having looked for that last link, I did what it says there, but was not convinced. I think it would probably work better if you have long lengths of seam like shown, rather than wee patches.

So, plan B: Butting edges together and then doing a joining stitch.

(The step in the centre is not in the plan, but happened with the start of one of the stitches I tried...and abandoned!)
I had not allowed for a wee space anyhow. So, I will be happier that everything is somewhat near the original size and goes together if I butt the edges together.
I really like the machine feather stitch, so I tried that. It would work, but I risked covering all that tedium of metallic zigzag. So, no.

I tried a few others and opted for a stitch listed in my 'quilting stitch' section.
Then I played with the width and length. The default needed to be just a bit more width so that it wasn't falling in the middle of the zigzag on each side.
I also wanted it to be a bit more length so that the stitch is open enough to show all my hard work beneath.

When I get closer to having all the edges done on the patches, I might take a few hours break and begin to join some of them so I can see how long that takes!

There are a few more things I would like to do. But at this point it is about timing. I will tell you if I get time for that option or not.

I need to get this to the point where it looks somewhat like the finished product for the camera. Sending that and statement off for their catalogue. I will have time to do finishing off...like lining hem, etc, but this year I am NOT finishing things like fastenings the night before the show.

Last year was the first time they did a catalogue. I thought that when they asked for photos by a certain date that they were trying to ensure people didn't pull out. That is how it worked for another show I did gowns for. So, I was rather dismayed to see my in progress photo in the catalogue! I had been invited very late, and had to fit it in with other obligations.

Anyway, I am on the feeling hopeful stage of making. (It is a cycle you know. Very excited to get started. Very worried before the patterning; then up again. Very bogged down at the tedium. Thinking ahead to an alternative if you run out of time. Turning point on making progress and then worry about the construction solving. and so on!) I hope the hopefulness increases!

Saturday, 20 June 2015

sampling

So, now that I chopped out the pieces of the pattern and the mull together, I am ready to cut out the fashion fabric.

In this photo, I have the pattern pieces which will be of this lilac coloured fabric and I have arranged them for being conservative with the fabric.

I have also cut the rest of the pieces from the embroidered sea-green coloured fabric.

And so it is time for sampling.

And here I found that the mull on it's own was not sturdy enough to support the fashion fabric to do my planned zigzag edge on the fabric pieces.
And also the mull being a somewhat loose weave, leaves whiskers on the edges! Especially on the embroidered fabric which isn't as sturdy as the lilac one.

So, I am being very thankful that I have plenty of this taffeta fabric I used for the lining. So, I tried using it at the back of the little sample sandwich. (Fashion fabric, mull and taffeta) and this also brought the realisation that in some cases the back of these pieces may be seen, and thus the lining fabric is a good plan. So, more cutting is called for.*

As for the thread sampling...
I showed all the different threads I was contemplating. And then when the chosen one wasn't really doing the job, I looked over and saw these wonderful threads!

They are metallics from Sulky. But they glisten in pastel colours instead of your normal metallics.

And there were a few that were just right.

So, the chosen top thread has become the bobbin thread. That way, if the back side of the pieces is seen, it will still be lovely!

Bobbin thread - Sugar and spice from Thread Studio

And yes, I realise at this point that I could do away with the mull altogether. But, oh well. I am being stubborn about it because I took all the time to cut it out!

*Please imagine me doing all this cutting with a shoulder that is shrieking pain for some reason. The hypersensitive nerves seem to say the shoulder is dislocated from the neck. (This is called Fibromyalgia doing its thing.) Even if it is not dislocated and will probably be fine next week, it still is very painful!

Oh yeah. It is very hard to use your non-dominant hand for stuff like this!

Monday, 1 June 2015

What I did on Saturday

Getting ready to go to America.

Plastic poppers...just right for the top of this new blouse. The beads made it a little heavy and the stand collar wasn't standing, but flopping.

All very tidily sewn with buttonhole stitch. So, if I want to leave the top button undone, it still looks okay.

Thursday, 21 May 2015

New Ramshackle - 4

So, with the hard to puncture back fabric - polyester crepe de chine...and the easily shredable front fabric...and add to that the cotton wadding and the cotton backing... I had issues with the quilting.
A thin needle (the size I had for microfiber) meant I was shredding the thread when it was trying to go through all that and at a free machine quilting (slow) speed.
A thicker embroidery needle meant I was shredding the front fabric in the narrow places.
-and altogether the tensions were all over!

SO, I dug out these needles. Titanium coated topstitch needles.

At some point I was convinced by the vendor - who 'Does Know Their Stuff' - that these were best for everything. However, the price made me 'save' them. They have worked in this situation of random fabric types and thicknesses. I might have preferred a slightly smaller size, but at that time they only did 90/14. Recently I heard they now have 80/12. Good to know.
No, I am not going to use them for everything. But when I need them, I have them.

And the stitched result.
No obvious tragedies!

And now I am doing the binding. NOT in polyester crepe de chine, I hasten to add! Yikes!
I hadn't a full 12 x 12 in square of blue cotton, but I had some strips of blue cotton. Not precisely the colour of the polyester crepe de chine, but since the sun fabric hasn't just the one colour of blue, it will work fine.
And then to the post.
I have decided on a name...reveal tomorrow.