
Showing posts with label Misty Fuse. Show all posts
Showing posts with label Misty Fuse. Show all posts
Monday, 17 September 2018
Ramshackle ideas 4
Over the weekend I trimmed the fabrics to the right size. And today I finished fusing them with Mistyfuse®, fusible web.
 The lightweight fusible is not glue adhesive. It also doesn't change the hand (handling) of the fabric.
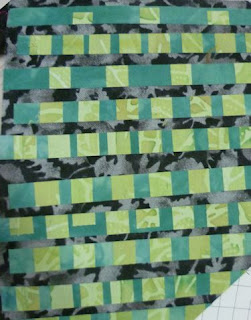
Thursday, 3 September 2015
Building a fabric-2
Yesterday my computer time was taken up with writing a newsletter. So, here we are with the next bit of building a fabric.
 We had just got to fusing the 3rd fabric and needing to slice up the fabric which was a combo of fabric 1 and 2.
 This time the fabric needs to be cut up in the other direction. Perpendicular to the pieces from the first fabric. Again I cut it in 1cm strips.
And then laid them onto the 3rd fabric (laying on the ironing board so I don't have to move the fabric when I have everything placed.)
 I staggered the strips.
I rarely use the pieces on the very end. But on this layout, I cut little bits from that strip to place on edges because the 2nd fabric was a little too wide.
 To put the little pieces on the edges increases the amount of fabric you can use.

When this fabric layout was fused, I then cut fabric no. 4 a little wider and a few inches longer than the current combined fabric piece. And fused the back of it.
 Fabric no.4 is a crepe back satin. So, I used the shiny side up as it 'reads' lighter.
Again, time to slice the fabric, but remembering to go the opposite direction. Stagger the strips on the 4th fabric.
 This is where you begin to see how exciting your 'new' fabric is. So many little bits of fabric in many different combinations and coming together in a way you could never have developed if you didn't follow these steps.
Now fuse them down.

One last go! Cut fabric no. 5 a little longer and a few inches wider than your combination fabric. I cut mine from the back of the crepe back satin...the crepe side 'reads' darker. Put fusible on the back.
Cut the 1cm strips from the combination fabric (no.1-4)

Place them on fabric no. 5 and fuse them down.
And for my purposes, this now is the final fabric!
 This fabric will be cut into the shape and then mounted on an even darker blue.*
Do you see how interesting this new fabric you have built is? A lot of movement, a lot of texture, and a lot of combinations of the shapes and colours.
I usually use shades and tints of a certain colour, but you can do this with a variety of colours. I wanted to build a fabric to use for a jungle.
 After this step, I also cut the strips diagonally.
You can see how this piece could be developed to show the idea of leaves and shades of the jungle.
There are a lot of places in the steps which I covered where you can say, What if I did this? It all depends on what your final use will be. But for the most part, you need to do at least 4 steps. If you are doing more than 5 steps, you need to be sure your fabrics are well fused to one another in the first few stages. Otherwise, they are tiny when chopped up and can easily begin to come undone.
After cutting my shape, when I fuse it to the backing fabric, I also do a bit of free machine embroidery. The fusing is good, but as it is pieces, could easily get caught on things, then pieces can get picked off.
Do remember though that you have several layers in some parts, so take your time and use a larger needle so it has more oomph to push through. Oh, and if you haven't used Misty Fuse, the glue in the fusible areas of the layers may create their own layers.
It may also mean that because the needle is working harder, it gets hot and you might find the glue melting/sticking to the needle, gumming it up. You can still do it, but you may have to have a handy bit of the hand cleaner gel on a bit of fabric to clean your needle off every so often. You will know! The thread starts to shred! (I haven't tried this, but I understand a needle with titanium coating is helpful in that instance.)
Another idea I have done in the past is to layer the whole with a synthetic organza - free machine it down in a close pattern, and then zap it with a heat gun. Some of the organza will melt away between the stitching to reveal the built fabric. It also creates a wonderful crunchy texture where it has melted.
Let me know if you try this!
*This fabric I have built will be used in the piece I am making for the Fly Me to the Moon project. Quilts made to the theme of the Moon will be put into a book to celebrate the 50th year anniversary of the Moon Landings.


And then laid them onto the 3rd fabric (laying on the ironing board so I don't have to move the fabric when I have everything placed.)

I rarely use the pieces on the very end. But on this layout, I cut little bits from that strip to place on edges because the 2nd fabric was a little too wide.


When this fabric layout was fused, I then cut fabric no. 4 a little wider and a few inches longer than the current combined fabric piece. And fused the back of it.

Again, time to slice the fabric, but remembering to go the opposite direction. Stagger the strips on the 4th fabric.

Now fuse them down.

One last go! Cut fabric no. 5 a little longer and a few inches wider than your combination fabric. I cut mine from the back of the crepe back satin...the crepe side 'reads' darker. Put fusible on the back.
Cut the 1cm strips from the combination fabric (no.1-4)

Place them on fabric no. 5 and fuse them down.
And for my purposes, this now is the final fabric!

Do you see how interesting this new fabric you have built is? A lot of movement, a lot of texture, and a lot of combinations of the shapes and colours.
I usually use shades and tints of a certain colour, but you can do this with a variety of colours. I wanted to build a fabric to use for a jungle.

You can see how this piece could be developed to show the idea of leaves and shades of the jungle.
There are a lot of places in the steps which I covered where you can say, What if I did this? It all depends on what your final use will be. But for the most part, you need to do at least 4 steps. If you are doing more than 5 steps, you need to be sure your fabrics are well fused to one another in the first few stages. Otherwise, they are tiny when chopped up and can easily begin to come undone.
After cutting my shape, when I fuse it to the backing fabric, I also do a bit of free machine embroidery. The fusing is good, but as it is pieces, could easily get caught on things, then pieces can get picked off.
Do remember though that you have several layers in some parts, so take your time and use a larger needle so it has more oomph to push through. Oh, and if you haven't used Misty Fuse, the glue in the fusible areas of the layers may create their own layers.
It may also mean that because the needle is working harder, it gets hot and you might find the glue melting/sticking to the needle, gumming it up. You can still do it, but you may have to have a handy bit of the hand cleaner gel on a bit of fabric to clean your needle off every so often. You will know! The thread starts to shred! (I haven't tried this, but I understand a needle with titanium coating is helpful in that instance.)
Another idea I have done in the past is to layer the whole with a synthetic organza - free machine it down in a close pattern, and then zap it with a heat gun. Some of the organza will melt away between the stitching to reveal the built fabric. It also creates a wonderful crunchy texture where it has melted.
Let me know if you try this!
*This fabric I have built will be used in the piece I am making for the Fly Me to the Moon project. Quilts made to the theme of the Moon will be put into a book to celebrate the 50th year anniversary of the Moon Landings.
Tuesday, 1 September 2015
building a fabric
If you remember back in January I built a fabric from a variety of fabrics to make a dragon.
Well, now I am starting to build a fabric again, but this is for the project I can not show.
I have started with a selection of colours - dark medium and light - which when together will give the look I want.
 In this case, I have been drawn to the shinier fabrics because the thing I cut from it needs to have a bit of a glow. (I have asked if I can actually tell you what it is I am making from this, even though I can't show it. Still waiting for the reply.)
I am starting with the lightest piece. It will end up in the smallest bits, so they will be highlights, if you will.
 This piece is an offcut of lining I somehow ended up with in my stash. I have a good collection of bits of shiny and lining fabrics. I started collecting them when I used to do dressing up costumes for the school. You always need things to make a child feel like a prince or a princess! And now they are useful when you need a small bit of this or that. This piece would normally be tossed because it has light fading where it was folded. But that works for me because it means the fabric is not flat - all one colour. Instead it has a subtle ombre affect.
I cut a piece - I am not precise about measurements. You can see from the metric ruler above and the inches cutting mat below and the dot matrix feed paper it is on, that it is about A4/letter paper length. The width was just the width of the offcut!
I put fusible on the back of the fabric with black Misty Fuse. Normally I wouldn't use black under a light fabric, but I wanted subtle texture. I laid it on the paper so you can see the webbing of the Misty Fuse fusible.
 About fusing with Misty Fuse. It does not come with a backing paper, so work with 2 layers of baking parchment. Always lay the item to be fused between the layers when you fuse. Sometimes your fusible is cut slightly bigger than the fabric (see the left edge of the piece above), so you will have edges of fusible you want to protect the iron from. and of course you want a layer between it and your ironing board as well.
 A VERY GOOD TIP: write or squiggle something on the side of the parchment that you are going to have next to the fusible. That way when you use it again, you can be sure not to put your iron onto fusible that remains on the paper. It is easier to see the black, but white fusible is easy to miss...till it is on your iron or ironing board. I wrote "This" this time because I used an X last time and had to keep looking very closely to see which side it was written on! Because the baking parchment is translucent, I can tell if the word is up or down better than if an X is.
Another good tip...let it cool down before you peel the parchment away. It comes away much easier.
Then I cut the next piece which is the lightest of the darker fabrics, and put fusible on the back of it, too.
 It has been cut a few inches longer than the first one, and a little bit wider. This is a lighter weight fabric, so it bubbled a bit. Probably because I didn't turn the steam off. But I don't mind. It will be small pieces in the end, and lots of pressing, so any bubbles left will be a bit of texture.
It is a good idea to leave this fused piece on your pressing surface when you have peeled away the paper because you will lay strips onto it and it is not easy to move it to fuse them down if you do the placement somewhere else!
Next, I began to cut the first fabric into strips 1 cm wide using the width of the fabric. I placed them staggered on the second fabric and with small gaps between each strip. Don't be too precise about the placement. The slight unevenness will help the work to be more alive. Or in art speak - have movement.
 You can stagger alternate - to one edge then to the other edge,
or you can make the staggering less abrupt by having strips halfway between.

For this one, I chose the second method because when it gets all chopped, it gives some interesting effects.

At this point, the 2nd fabric has already been laying on a layer of baking parchment on my ironing board, so all I have to do is lay the other piece of baking parchment on top and press to fuse.
 Once I am sure the fabrics are sticking together, I turn the whole sandwich (baking parchment with fabrics between) over and press again to be sure they are fused well.
The next step is to cut a piece of fabric a few inches wider than this new piece you made and a little longer. I chose the second lightest fabric.

Then fuse it.
More about cutting into strips and placement tomorrow. But if you are following along, don't cut it the same direction as these strips were cut!
Well, now I am starting to build a fabric again, but this is for the project I can not show.
I have started with a selection of colours - dark medium and light - which when together will give the look I want.

I am starting with the lightest piece. It will end up in the smallest bits, so they will be highlights, if you will.

I cut a piece - I am not precise about measurements. You can see from the metric ruler above and the inches cutting mat below and the dot matrix feed paper it is on, that it is about A4/letter paper length. The width was just the width of the offcut!
I put fusible on the back of the fabric with black Misty Fuse. Normally I wouldn't use black under a light fabric, but I wanted subtle texture. I laid it on the paper so you can see the webbing of the Misty Fuse fusible.


Another good tip...let it cool down before you peel the parchment away. It comes away much easier.
Then I cut the next piece which is the lightest of the darker fabrics, and put fusible on the back of it, too.

It is a good idea to leave this fused piece on your pressing surface when you have peeled away the paper because you will lay strips onto it and it is not easy to move it to fuse them down if you do the placement somewhere else!
Next, I began to cut the first fabric into strips 1 cm wide using the width of the fabric. I placed them staggered on the second fabric and with small gaps between each strip. Don't be too precise about the placement. The slight unevenness will help the work to be more alive. Or in art speak - have movement.

or you can make the staggering less abrupt by having strips halfway between.

For this one, I chose the second method because when it gets all chopped, it gives some interesting effects.

At this point, the 2nd fabric has already been laying on a layer of baking parchment on my ironing board, so all I have to do is lay the other piece of baking parchment on top and press to fuse.

The next step is to cut a piece of fabric a few inches wider than this new piece you made and a little longer. I chose the second lightest fabric.

Then fuse it.
More about cutting into strips and placement tomorrow. But if you are following along, don't cut it the same direction as these strips were cut!
Wednesday, 12 November 2014
Fusing
And with the decks clear, I have begun! Or at least I have started the fusing part.
One of the reasons I wanted the working table clear is because the size is over 1m both ways. It would make it easier to fuse the fabric if I could use the table. The worry, though, is that the table is actually an old (vintage?) desk. There is a piece of leather set into the wood surround. I didn't want to ruin that.
So, I knew I had a felted wool blanket. Still I didn't want the heat to go through that. In the cupboard with the blanket something made me move a bag on top of a box. TADA! A table protector for protecting dining room tables from heat! I remember now that I had hoped it would fit our dining room table when it was at it's smallest size. But it didn't. However! Joy of joys...it was bigger than the fabric I wanted to fuse. So, just right for this purpose.

So, layered table protector with wool blanket on top and Yes, the little heat that did get through to the table protector went no further.
More positives here...
For some time I haven't been using my 'good' iron because the steam stopped working...a little rusty bit fell out.
 However, it still heats. I thought that it would be good for this because with no steam, I had even less worry about the desk top. Wow! I am glad I hadn't got round to letting this go yet. It gives out so much more heat than the iron I have been using. So, some of the recent problems I had been having with fusibles not fusing properly were solved as well. So, the 'good' iron is still a Good Iron for this use! Besides the heat, it is heavy - so the weight for the fusing is good. AND it has a long cord which works for reaching from the plug in to the opposite side of the table.
So one piece is fused now and I can begin working with it. Well, I do need to do a few sketches now that I know what size fabric I am working with.
 I used Misty Fuse black for the fusible. And I used baking parchment to protect the iron. The fusible peels away from it easily if you let it cool first. I have some of the Teflon baking sheets I used to use sometime ago for fusing. (but hard to get things right because you can't see through.) I didn't want to fuse to the wool blanket accidentally, so I used the Teflon sheets under the fabric at the sides for just in case there was fusible over the edges.
For now it is hanging up on the design wall to keep it from creasing. While I have the fusing set up, I think I will fuse the other half of this fabric. Then it will be ready if I am able to do two designs. (The call for entry allows 2 pieces to be entered.)
 Raring to go!
One of the reasons I wanted the working table clear is because the size is over 1m both ways. It would make it easier to fuse the fabric if I could use the table. The worry, though, is that the table is actually an old (vintage?) desk. There is a piece of leather set into the wood surround. I didn't want to ruin that.
So, I knew I had a felted wool blanket. Still I didn't want the heat to go through that. In the cupboard with the blanket something made me move a bag on top of a box. TADA! A table protector for protecting dining room tables from heat! I remember now that I had hoped it would fit our dining room table when it was at it's smallest size. But it didn't. However! Joy of joys...it was bigger than the fabric I wanted to fuse. So, just right for this purpose.

So, layered table protector with wool blanket on top and Yes, the little heat that did get through to the table protector went no further.
More positives here...
For some time I haven't been using my 'good' iron because the steam stopped working...a little rusty bit fell out.

So one piece is fused now and I can begin working with it. Well, I do need to do a few sketches now that I know what size fabric I am working with.

For now it is hanging up on the design wall to keep it from creasing. While I have the fusing set up, I think I will fuse the other half of this fabric. Then it will be ready if I am able to do two designs. (The call for entry allows 2 pieces to be entered.)

Friday, 23 November 2012
name badges
Next week the ladies from our church are hosting a Ladies Christmas tea. There will be somewhere between 50 and 60 ladies. So, tonight some of my friends met to make name badges. We even had one of the husbands cutting out wee aprons!

The little gingerbread ladies have been cut out of fused green fabrics - using Misty Fuse -, little aprons have been cut out of fused white fabric. Loads of little red bows have been tied. Next step, fuse the aprons on the ladies and the ladies onto the red felt, not forgetting to slip a bit of ribbon or glittery string onto a safety pin and then between the layers before fusing. Then cut the whole of the badge out of the felt. Glue gun the bows on for a splash of colour.
Make sure I have enough pens for guests to write their names on the apron!
The pin string bit means it can be hung on the tree at home. Fun!
Everything gathered from my stash!
Tuesday, 28 September 2010
SAQA fund raiser
Sometime back I told you about a piece in my Communications series that I had made for the SAQA auction. The auction started last week and my piece was in the first stage. Each day the amount went down and I was beginning to think no one would want it.

However, today I got word that the lady who runs Misty Fuse had purchased it! I was very excited because she had been very generous to me when I was at Houston. She gave me several packets of the Misty Fuse for my work when she heard about how I was using it.
I wasn't sure she bought it just because she liked it or also because she remembered me. Well with thousands of people, how would she remember me? Anyway, I emailed her and sent the photo above. There was a photo on the SAQA website, but it was taken on white background. It looks different on black, so I thought she might like to see the difference while she was waiting to receive the piece.
She wrote back to say she had seen the piece early in the week and loved it but hadn't been able to get back on to the site til now and how glad she was that it was still there!! and she HAD remembered me!!
I also told her that it was made of sheer layers and Misty Fuse, so she was even more glad!
So, the next thing is...when will I sell something for money 'I' can keep? LOL
Thursday, 6 November 2008
Midnight Dance by Moonlight - detail
Seeing that I haven't worked any more on the jeans from the workshop last week, I thought I would post some close-ups of the Bernina Garment. Some of you have asked for a bit more detail. Some of the details were hard to photograph since the light shone off all the sparkley bits.  Coat collar and star sequins - these are sharp! the coat is very heavy and when I tried to lift it up to Mademoiselle's shoulders I kept getting stabbed!
(Mademoiselle is the thin dummy's name; she is adjusted to suit the Bernina model shape. Curvy, thin, and tall...the other is M'Lady; she is adjusted for me and we won't go any further with that description!) Beaded tassels at ends of release darts.
Darts covered by line of blue bugle beads whipped with silver beads.
 Beaded stars on "Shoon" moonbeam edged with silver metalic cord whipped with blue bugle beads. Some detail of the paterning for the beaded moonbeams.
 Detail showing two of the beaded moonbeam patterns on the lower part of the coat.
 Even closer detail of one of the six beaded moonbeams. I used the diamond pattern of the coat to guide me with the pattern. I only used one or two beads or sequins in more than one pattern.
 Fuzzy view of one of the foiled moons on the skirt. I used circles of Misty Fuse which I fused to the skirt and then foiled with holographic silver foil.
Coat collar and star sequins - these are sharp! the coat is very heavy and when I tried to lift it up to Mademoiselle's shoulders I kept getting stabbed!(Mademoiselle is the thin dummy's name; she is adjusted to suit the Bernina model shape. Curvy, thin, and tall...the other is M'Lady; she is adjusted for me and we won't go any further with that description!)
Beaded tassels at ends of release darts.Darts covered by line of blue bugle beads whipped with silver beads.
Beaded stars on "Shoon" moonbeam edged with silver metalic cord whipped with blue bugle beads. Some detail of the paterning for the beaded moonbeams.Detail showing two of the beaded moonbeam patterns on the lower part of the coat.Even closer detail of one of the six beaded moonbeams. I used the diamond pattern of the coat to guide me with the pattern. I only used one or two beads or sequins in more than one pattern.Fuzzy view of one of the foiled moons on the skirt. I used circles of Misty Fuse which I fused to the skirt and then foiled with holographic silver foil.Close-up of the front jacket where the man and lady sides met. The lady's bodice was done with another fused technique, stitched and then zapped with a heat gun and embellished with sequins and beads. The vintage brooch at the waist was a charity shop find. I knew it needed something so I went out on a mission and found just the right thing!! Detail of the boa before I overlocked the edges with royal blue thread from Sulky.
Wednesday, 5 November 2008
Midnight Dance by Moonlight

 Well, here I am back again. Exhausted, but a brain full of ideas and memories.
Here are some "unofficial" photos of my Bernina Fashion Ensemble. The theme was Rendevous, so I wanted to depict lovers dancing by moonlight. The model is my friend Aimee. She just had time to try it on before I sent it off in June and before she moved off to Dubai. Although she isn't as tall as the models, she has been very helpful, since the gowns fit her in the torso area.
First is the hat and coat. The inspiration is Walter de la Mare's poem Silver. The hat, of course, is the moon. The coat is inspired by medieval design and sparkles with moonbeams of crystals, beads and sequins.
Down the back of the coat is a large silver moonbeam train of silver tissue metallic organza. For me this is the "moon's silver shoon" as from the poem. Just the beading on the coat took 7 weeks (sort of 9:00/10:00 AM to 10:00 PM every weekday!) and 7 reels of Nymo beading thread!!
Inside the coat on the lining is the scene of the couple dancing by moonlight.

 Here is the gown.
It is realy a bodice section and a skirt.
I wanted to realistically show the man and lady dancing. So, one side is the "man" with a "tuxedo" - tailcoat, waistcoat, and straight skirt/trousers. The lady's side is a bustier and full circle skirt with circular ruffles on the hem and a circlular ruffle boa.
The moon shapes on the skirt are cut from Misty Fuse and then foiled. I like the etherial effect the Misty fuse gives. It is more web-like so doesn't give a solid "spot".
Here is part of the commentary on the gown.
Perhaps this ensemble would inspire de la Mare to add yet one more scene to his silvery landscape!
And, lo, beneath Moon’s silvery light,
Hidden almost out of sight,
Lovers lost in their delight
Whirl and dance throughout the night.
And, lo, beneath Moon’s silvery light,
Hidden almost out of sight,
Lovers lost in their delight
Whirl and dance throughout the night.
When the "official" photos come, don't be surprised if the skirt is round wrong! They didn't seem to read the label saying BACK or to look at the photos I sent. (Both these things we were asked to do.)
I have a head full of things I could say about this project. but if you want to know more, please leave a comment and I will respond. Just click on comments and it should take you to a screen where you can fill in what you wish to say. If you haven't got a google account, you can comment as a guest. If you put your email addy, I can reply to you privately if you wish.
Subscribe to:
Posts (Atom)