Showing posts with label Pattern. Show all posts

Tuesday, 14 May 2019

Pattern and sewing

I have nearly got my room back in order since the rearranging for the lift.
This week a friend is coming to get help with fitting patterns. I haven’t worked with published patterns for years.
However I picked up this simple top pattern at the sewing group recently. I need a few more tops and I thought this might be a quick make.
So firstly, trying it out on a remnant I also picked up to ‘recycle’. I hope it will work well enough for a wearable toile. The add plus being that I can remind myself of what I might need to do or say when my friend comes round. She basically wants a shift dress that will fit. And that is not so far from this simple top. 
Or that is the idea. 😉

Friday, 6 January 2017

updates

Well, the Willows by the Watercourses wearable art was not required for the H2Oh! exhibition.
But as they had 521 entries, with space for 34, it isn't surprising.

So, now I will do a bit more to create a bit of texture on the bark. And, with Tears for the Daughters of My People, I am 2 up on my solo show at Lady Sew and Sew in March! Also, I can use them for the fashion show in the summer.
I had been saying I wanted to get ahead so I wasn't always doing something for the last minute!

*********************
In the meanwhile, Pattern Review sent me a pattern for managing the Menswear contest in late Nov, early Dec. (I could choose.)
not sure when I will make a coat not drafted for me specifically...but you never know.

And the current contest is about sewing UFO's. (Un Finished Objects) and I have hopes of getting some of the blouses finished that have been hanging on my cupboard door. We shall see. We are going on a quick visit to York next week for a memorial service for Mum at the care home she used to live. Quick visits have quite a lingering affect on me. 😩

Monday, 3 October 2016

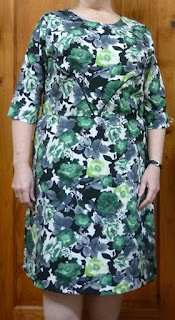
Colette Rue - my version

Then, having completed 'Tears' and submitted to SAQA before the end of September and even before bedtime on Friday - with help from Mr. Thoughtful who did the photos.... Why do I always do work that cameras can't focus on? ...fabric, rust, quarts crystals, what do you mean focus?
...
I then worked ALL day Saturday to make the dress for the 3rd round of the Pattern Review Sewing Bee. Okay 10:30am start, but that is early for me to get in here to work. and 15min for lunch and a bit of time to make dinner. So, 10:30am started cutting and completed the review at 12:30am late night.
If you want more of the details, you can read it here. As you remember, we were to make a garment using a Colette Rue dress pattern which was provided.

Never again will I cut and make a whole lined dress in one day, Thankyouverymuch.

And here are some photos.
Keep in mind they were taken at 11pm and thereafter.

front

back

detail

Wednesday, 28 September 2016

Ch-changes

The 3rd round of the Pattern Review Sewing Bee requires you to use a supplied pattern download and make it your own while still retaining the look.

So we were given access to a download of the new Colette Rue pattern.
I am doing view 2.

I don't normally work from other people's patterns. So after I got it printed out and taped and cut, I compared it to my pattern.

For the most part it was similar.
Some of the changes.
The armscye (and the sleevehead to match).

This is the difference.

And I moved the tucks over the bust to be more at the side. which I think will draw less attention to a larger bust. shown in pink.

I have got the toile/muslin made and from evidence of that, I also opted to lengthen the bodice because I am uncomfortable with a high waist.
So, now to cut and sew the 'real thing'. more photos of things later when I am not so stressed about how much I am doing at one time!

Tuesday, 16 June 2015

Pattern planning and chopping

While I am thinking about colours, I start in with the drafting. I have a go to pattern for these show gown. Already long, I can make it shorter if the design requires it, or I can just use the bodice and so on. But at least I don't have to remember to add the length when cutting and then end up with more creative work to deal with forgetting!

I don't always trace the pattern to make a new one, but I do when I am changing dart location or planning to chop the pattern about in some way.
I always work without seam allowances because it means the nett pattern* is always going to be the same.

Then I add the seam allowance directly on the fabric...sometimes drawing with chalk, but mostly moving my ruler along to cut it at 1.5cm (which gives me the option of 1 cm if I need to skimp a bit for the amount of fabric I am working with.)
Dart division: left is the original shoulder dart
right is the new divided and shaped darts.
The pattern will be used first for the lining, and the darts will be sewn.
Then it will be chopped into double shoulder princess lines.
So the inside of the darts will not be needed on the resulting panels.

When I trace, I always check that the seams match on the paper so there is a better chance they will match in fabric!
Why? Every time you trace a pattern, you do little things that may throw off the construction. In the above pattern, I have planned the chopping for the back and am making sure the chopping for the front will be lined up the same.

The plan for the chopping! (That will eventually be explained!)


*In at least one of her Metric Pattern Cutting Books, Winifred Aldrich states "Students will find that it is easier to work with nett patterns (those without seam allowances)especially during the development of complicated styles."

Tuesday, 19 August 2014

First cut

This is an embroidered white on white fabric I got last year when we went to Goldhawk Road.

I need a white blouse most of all to go with the many pattern skirts I have. So this will be my starting pattern. The subsequent blouses for the On Pattern Many Looks contest will be based on this pattern.

I wanted to get a photo of the starting pattern pieces to act as a line drawing for the contest, since mine is self drafted and many of the others are choosing a published pattern as their starting place.

Pieces include the back and side back, side front and front princess style bodice. Collar and stand for collar. Long Sleeve and cuff. Separate button stand.

I have enough left of the fabric to make a skirt. No, not to wear with this blouse! but because I also need a 'plain' white summer skirt. I will probably line this with cotton if I make a skirt to give it a bit more heft. But I might do something a little more interesting with it. For now it is hanging on my cupboard door so I can consider it and so it will not be creased when I go to make up the skirt in September.

Monday, 26 November 2012

Girls Skirts

When my friend Karin was here I asked her about clothes for the children. She said they get quite a few donations for the under 10 year olds, but not much for the older children.

So, using some of the suggestions, like length(they like them midcalf) - and ease(elastic waist is easier to fit and they are happy with them), I have drafted a pattern using the standard charts for 10 year olds in the Winifred Aldrich Metric Pattern Cutting for Children. If I had access to a 10 year old, I would have just drawn round a simple skirt and made a pattern from that.

From time to time people give me fabric, so I am using some of that to make up some skirts. When I get enough for a small box, I will send them on to Ethiopia.

I have cut a version from some lightweight voile type fabric. Okay I don't like it at all, but Karin said they would like it. Basically it will be a prototype. I can send it in an envelope and get feedback. The children are not as developed as British children, so it may be that this 'size 10' may fit someone much older.

I cut a bit of shaping on the hips, and then divided and spread the pattern about 10cm in the back and 7 cm in the front. This is what WA calls slightly gathered skirt. I have drafted some pockets, too. What kid doesn't like need pockets!

If this plan works, I will have a go at shorts for the boys as well.

I have been very tired lately, so this is all I managed to do today. :( but then sometimes you just need to rest, I guess. Off to bed then!

Tuesday, 22 February 2011

progress - toiles and patterns

One of the things I found to be helpful for having a blog was to record the things I had actually made. It helped me see I Was accomplishing something. I see that I need to get back to doing that more.

So, the minute changes in a toile are unremarkable and shapeless garments on a hanger out of fabric you would not be seen in public wearing are not the most inspiring.
However! a try on of the little tweaks yesterday was very encouraging. So it wasn't made to look good on a hanger, it was made to look good on me. It does. but you will have to take my word for now.

And today, I sewed the cut out trousers from the autumn to see what they needed. I see the pattern says 2009. and I know the 2009 version fitted, but I do hate the loose back leg that happens when you draft for a padded bottom! I think it just makes the whole leg look bigger. So, I found a solution somewhere (should have written it down) and then lost confidence, or life happened after having cut them out. So, anyway, the new version was so nearly right I couldn't believe it. Why did I wait? and now I have made the odd tweaks needed to the pattern, but even these will be wearable!! no photo. I will put in the zip and waistband first.

Working with garments is a lot more of a lengthy process and quite less exciting at this point than making dragons. So, tonight I decided to bluetack the results on my cupboard doors. very good reminder that I have made progress during this half-term break.
From left to right
corset/bustier, trousers, dress/bodice block with sleeve.

I took a few photos of some tweaks for the dress in case it might help someone else.
The shoulder seam was too far back at the sleeve and too far forward at the neck. So, I glued them together with another bit of paper underneath. I made the marks for the changes and drew a new line between.
While I was at it, I redrew the curve at the neck. Even when you draft it, I always find you end up with something like a sharp angle. And now that the seam was not anywhere near the original curve, I redrew it so that the front and back will join smoothly at the neck. (Click on the photo to see the new line of the curve) I knew I needed to lose some at the top of the back neck, so that helped with getting the new join right. I did a bit of adjustment on the sleeve edge, too.

another adjustment I wanted to make was just a bit of ease in the bodice. snug is okay for some things, but you want to move in it too! when I looked in the mirror, I realised I needed more on the front in the bodice, but more on the back on the skirt. So, I did a similar thing that I did to the shoulder.
First, because it was a side bust dart, I folded it out. Then I added the amount I needed* to the front. Then I laid the back bodice portion next to it to check and to make sure the balance marks/ notches would be accurate. Again, while the 2 pieces were together, I made sure I got the curve right where the new portion had been added.
Then I cut along the new line with the dart still folded out. When it is unfolded, you can see that you get the triangular shape which pokes out from the side on the pattern. This is needed so the dart can lay along the seam properly and can be anchored into the seam after it is sewn up.

yes, I could have drawn the line with the dart open and just add the same amount on the different angles of the dart. but I find you often lose the precise points where the angles change.

*I worked out how much to add by how much the seam was pulled out of line. so it was about 1 cm to the front bodice and so on.

Tomorrow I am off to visit a Certain Lad and if possible go to Fibrecrafts for some things on the wish list. I might get to post til Thursday though.

Friday, 20 November 2009

paper coat

Today was a bit of a paperwork day; agendas and maps for tomorrow's Thames Valley Contemporary Quilt Group meeting... lesson plans for Monday's session at college, etc. But here is something else I did.

I made up a pattern for a 3D coat to use for a story with the children on Sunday. I am quite chuffed with it. I may use it for an idea for a 3D piece of art at some stage!

off to bed...

Sunday, 1 March 2009

Pattern Changes

Laurie, from one of the sewing lists was asking about adjusting a pattern for fitting a rounded back. I did this when I was fitting a friend.

That list doesn't have a communal place for posting photos. So, I have posted instructions here and posted a photo of the pattern. I drew lines with Paintshop Pro to help with understanding what I mean.

1. Cut down from the back shoulder darts, and straight across. (Blue line on the photo)

2. Raise the centre portion up the extra amount you need, and insert paper to fill in.

3. If you make this up, you will have a small pouch of fabric behind the arm (like some people struggle with extra fabric at the front). To deal with this, you need to cut from the armscye at that point to the tip of the back shoulder dart and this time overlap the paper. You will need to actually move the whole section down, rather than tip it at an angle, or the shoulder line will get too long. (The pink line shows where this section has been moved down.)

4. Redraw the top part of the rest of the shoulder. using the original pattern line for a guide, match it up with the CB and the neckline , but angle it down some toward the armscye. (The green line shows the pattern before adding the extra amount.)

5. Redraw the shoulder dart and the armscye. (The red line shows the pattern line before it is redrawn. The yellow line shows the redrawn armscye and shoulder dart and shoulder line.) It helps to know what your original armscye measurement is, so you end up with something near the same as before.

You may need to do a bit more fiddling, but don't over fit it or it will accentuate the rounded back.

By doing these things, the fabric can hang from the rounded area without cupping under or hanging up on it. The look is much more flattering.

Maybe this can help you with your patterns as well.