Tuesday 30 June 2009

Inspiration Tuesday

My husband proudly collected our first beetroots from the garden at the weekend.

I thought I would show you some possibilities of getting inspiration from this sort of photos.

First of all, take several photos. some with and some without flash. I liked this one best for showing the different parts best.


Next I cropped the stems (and saved it as beetroot stems). This would give interesting line designs. If I were to develop it further, I would probably thin some of the stems out to give spaces in the bunch.
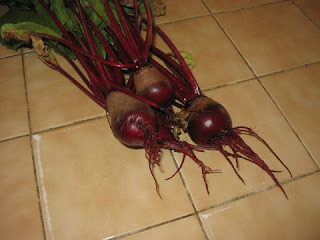
Next, I clicked undo for the crop and cropped the roots.(save as beetrootroots!)

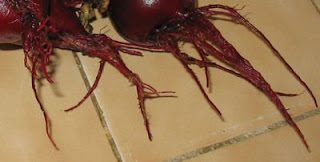
One of the other photos wasn't as great, but showed an angle of the left root, with an interesting curl. It was not as great for focus, so I sharpened it. It is actually more in focus at a much smaller size. I still have the original photo, and so if I decided to go an look at this further for the design possibilities, I would save it at a very small size and then go read up how to keep the focus but increase the size.
And then, back to the original of the other photo, I also cropped to show the texture.

So, if I decided to use the beetroot for inspiration, these photos would be a start. (There are more aspects to get inspiration from...the leaves and cutting it open for the colour and pattern inside, and so on.)
I could use one of these photos alone.
Use one or more with ideas gleaned from the others in the resulting work.
I could work with each one seperately influenced by the others) making the pieces of sizes that would work well together and then use the results in a major piece that showcased them all in someway.

How might you use the photos?

Monday 29 June 2009

at long last

So, I have been doing some diversionary occupations today.

I finished sewing the journal quilts together and sent them off. Rare for me, they don't need to be there til the end of July!

Then because it was too tense to watch Andy Murray's tennis game all through, I decided to cut and adjust my trouser toile while I listened!! I had a trouser block from 2004, and as I am now back to a similar weight, I thought it might not be too hard to work from that. So, this doesn't look like much, but believe me, I have been putting it off for years.

Now to see what sorts of trousers I can make.

Oh...and what I was diverting from? I am meant to be doing paperwork and assignments for my teaching training course which finishes on the 14th July! Okay, I am so chuffed with having a fitting trouser that I will probably accomplish much more when I work on the assignments tomorrow.

By the way, you may have noticed on the side bar that I put the courses I am going to teach in the next term at New Directions. The workshops at the library are there as well.

I am really excited about being asked to teach the City and Guilds Creative Techniques: Fashion 2! City and Guilds have reworked the Creative Studies Programme. This course will be similar to the old "Part 1" or the Certificate. I am looking forward to starting new with the new students embarking on the programme. The course will be on a Monday evening at the West Reading Centre on Wilson Road. If you live in the Thames Valley area and are interested in getting the City and Guilds qualification, do check it out. You can contact New Directions on 0845 842 0012. Or email enquires to info@newdirectionsreading.co.uk

Sunday 28 June 2009

2008 Journal Quilts - FOQ

Some weeks ago, in the midst of all the focus on teaching and studying and all of the other things I get up to, I was gutted to find I had missed the deadline for entering the Festival of Quilts. It will be the first time for a long time that I have not had something entered.

However, thanks to the Contemporary Quilt group and the journals we did, I will actually have something to show. About 40 of us will have 4 journals each displayed around the walls in the eating area. Not ideal, perhaps, and no options for having an artist statement, but it will provide some interest, we hope.
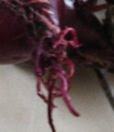
So, these are the 4 I have chosen. I am putting them together for the display. They gave us a very practical way of joining them. 1 inch strips of white netting (it will be on a white wall), stitched along the joins. Then a hanging sleeve will be added. So, here's me getting mine prepared to stitch together.

Joining this way makes it flexible enough to fold for sending off, means you can butt the edges together and stitch them without obsessing over ramrod straight edges, and the white net will fade into the white wall.

If you go, don't foget to have a look. You may recall I used Kool-aid dyed wool blankets and palyed with colour and shape...and learned how to free motion quilt with confidence.

Saturday 27 June 2009

Featured Blog

Today's Featured Blog is Beth's Blog, written by Beth Brandkamp. Beth has a good sense of humour and is known for her exciting marbled fabrics. She uses them in quilts and in wearable art. She has a good eye for working with bright colours.


Lately Beth has been taking "failed" dyeing attempts and is marbling over them. Check it out here and here. She is coming up with some really great pieces. Sounds great...instead of tossing the bits she is not so happy with, now she has some that will work really well in her various projects.


As for me? No marbled fabric here. You might have guessed, I am pretty good with doing most things...except knitting...and if I can read about it in a book, I can usually do it. However, sometimes there are certain techniques I would love to do, have books about, and in the case of marbling, have a kit for (!), but somehow haven't got over the hurdle to do it yet. Wouldn't it be great if Beth came over and I could get over my fear or what ever it is that is holding me back? I even was shown how to do it on paper when I was doing my C+G design principles and got good results. But I haven't done it on fabric yet!


If I could learn to do marbling on fabric. I know I would find ways to use it. In fact, if I had been able to do so, I would have marbled fabric for the lining of the coat of the Bernina Ensemble "Epic Quest of the Last Dragoness". As it was, I bought some fabric that was printed with a marbled pattern. The coat was meant to be like an old book and I wanted it to open to have the look of "end papers".

See what I mean? I even did a "bookplate". The printed marbled fabric wasn't just like I had in my head, but it was sufficient in the circumstances.

What is on your "I wish I could learn to do this" list? If it is marbled fabric, maybe you can get some tips from Beth.

Friday 26 June 2009

Rust dye unwrapped

And here is the bundle unwrapped! Perhaps you can tell that the fabric was folded down the centre of the length. The various bits of rusty files, large farm bolts and metal plates with holes and so on have made wonderful patterns! I have also been experimenting with a different sort of metal to see what happens. The outside was pretty dramatic, but the inside parts didn't react so well. So, I have soaked it in more of the vinegar solution and rewrapped it differently so that more of the fabric is exposed. Perhaps in a week or so we can discover that one, too.
On the other hand, I am thinking of something quite exciting for that look, so the reveal may be delayed til I make something with it.


After I open up the rusted bundle, I shake it out and then wash it with a bit of washing up soap (not too much!) on a quick wash (40°C).
Here is the result after it was washed. As you can tell, the overall look is a bit more muted, but it is still quite dramatic.
It was very dry before I washed it, so the fabric was quite stiff. I didn't notice the way the pattern has a bit of a curve to it until it had been washed. It reminds me of the sort of pattern you might see on a snake!

OR, the underbelly of a dragon?

Thursday 25 June 2009

Rust dye start

A few weeks ago, I wrapped up a length of cotton muslin with various rusty pieces. At long last I am going to open the parcel. Normally, I would have done so already, but the days have been very full of other things.

Today I took a day off! Strange! I read a book and watched the tennis from Wimbledon. So, no photos of work. (I guess I could have photographed the chicken lentil stew I made, but on second thought...no !) Just the bundle and the anticipation of opening it tomorrow.
until then...

Wednesday 24 June 2009

Book Cover - Student work

We had some good sessions yesterday and today with Crafts @the Library. The students really enjoyed doing the book covers. We had 3 new people, so that was exciting. Looks like the idea is starting to get around. We are doing the painted fabric next month on the 14th and 15th July and everyone seems to be looking forward to it. There were at least 3 people who looked in today and may come along the next time.

Here are some of the book covers the students made. I provided some templates if they wanted, for the applique, but most of them made their own designs! That was encouraging. I like independent ideas.

Mavis
Mrs. Simpson - Lynne - Dorothy
Sui with the help of her daughter Emily for the applique

Sui had never done stitching before!
However, she soon was doing it better and faster than most of the rest of us!

Simon

Simon is great for having a go.
I think he does very well, even though he thinks he's not so crafty!

Norma had to rush away yesterday, but she had a good head start. She plans on finishing hers at home.

You are welcome to join us next month.
14th July at Birch Hill Library, Bracknell 2-4 pm
15th July at Great Hollands Library, Bracknell 2-4 pm

Tuesday 23 June 2009

Inspiration Tuesday

Due to all the lessons and whatnot I have been involved with lately, I still have not got round to washing out the fabric I used to demo the tie dye technique to the students 2 weeks ago.
So, I needed to move the containers the other day and noticed that there was some interesting patterning going on. Here is a close up.
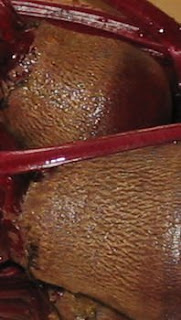
It is very interesting for texture, for lines, etc. I don't know if it will remain when it is washed, but it has made for an interesting inspiration photo!

Monday 22 June 2009

Book Cover - kits

Normally, I don't like the idea of kits. I like to give people a choice. However, for the Crafts @the Library session tomorrow at the Birch Hill Library and Wednesday at the Great Hollands Library, we are doing book or notebook covers. And, as you must be tired of my saying, we are working when the library is open, so will have to hand stitch and use liquid adhesive rather than sewing machines and fusibles.
I really don't know how many are coming. It may be more than we normally have, since the event is listed in the leaflet about Bracknell Community Arts week. So, because I was already going to have to fuse the interfacing to the fabric and overlock the edges so the pieces won't fray, I decided to do kits. I have included a piece of fabric which can be used to cut into shapes which can be painted with the adhesive and then attached to the cover. I also added the wooden bead, and will cut a piece of the elastic to size and include it. I will be bringing the pack of beads and some extra fabric scraps in case, but since the main focus is working out how to make a cover, I think it will be alright. They will get a choice of embroidery thread to stitch with or to use to embellish if desired.
I had a very large amount of quilting fabrics given to me by my friend Gabrielle, and I have been using these fabrics for these various workshops. The colours are interesting to revisit, as current quilting fabrics have their own look. For instance, I am lacking a bit in bright fabrics, partially because I passed most of the fabric on to Helen to use in Charity quilts. I am trying to have a good selection without cutting into larger pieces. At some point, though, I won't have any left! And so back to the kit idea, I just had visions of yet another box of left over parts I have prepared for a specific use. Doing it this way means I can dip into the stash again for other projects.

So, there we are. I guess I need to remember, as well, the cost for the supplies are really not being recouped.

Basically, I just need to give myself permission to supply what I can without fretting about it!!

Sunday 21 June 2009

problem solving - colour loss

On the 10th July, there will be a Fashion Show put on by tutors and students from New Directions. Because I am a new tutor, it would be nice to show some of my work.

However, this presents a few problems. The Bernina Garments won't return til August sometime. And, most of the things I made when I did my C+G Fashion that fit me ( ...I went up and down in weight and my formal wear piece was for a child...), I have actually been wearing.

A lot.

Some of them look rather shop worn. So, today, I decided to see what I could do about the red and black jacket and skirt. The skirt was made later, but I used trimmings of the black suede from the top part. Although you can wash suede, in this instance, when I did, the black faded a lot. I figured, what could it hurt to see if I could get the black to be dark again by colouring in the bits with a permanent pen? I have been using permanent pen with some of my fabric painting designs.

So, here is a photo part way through the process. The darker ones have been coloured in already. Looks good. I am quite pleased with the final result.

Also, over the years, the curly bits of the overlay on the jacket have become rather curled in on themselves. The overlay was meant to be removable, but I never wear it that way. It is actually a bit floppier than I like, for instance, I have to adjust it if I lean over when wearing it. So, I decided to make it more permanent. I put it on M'Lady, and have been painting a fusible adhesive to the back of the overlay...not everywhere, but along the outer edges by the front and shoulders, and some of the curly bits. I will see if it needs anymore after those parts dry. I am not sure if I will colour in that overlay, but I will see what the skirt looks like with the jacket.

So, there is a problem solved. A much loved outfit has been refreshed!

I have also dug out some of my Tudor garments. It seems one of the students has 2 daughters who would be perfect for modeling these!

Saturday 20 June 2009

Featured Blog

For today's Featured Blog, I want to introduce you to the blog of my friend Margaret Cooter. Margaret has her camera or phone camera with her everywhere and discovers the most interesting sites as she goes round London.

In the past few months, having recently retired, Margaret is doing a Foundation Course in Art (I think I got that right). Anyway, it is fascinating to see the step by step process and discovery of the various art forms and medium as she encounters them on the course.
Margaret has also had work exhibited through the Contemporary Quilt group and other groups round London.

Margaret is also on the committee to get people to make and donate an A4 size work, dubbed "Little Gems". They are similar to the quilts made through the Journal Quilt project, which was shown in Houston for several years. These Little Gems will be available on a tombola stand at the Festival of Quilts. All the proceeds go to the continuation of the newly opened Quilt Museum in York. If you are interested in making something, you can check out the website set up for the purpose. Little Gems are being made by both Traditional and Contemporary Quilters. There are also patterns available for those who are not comfortable with coming up with designs in their head.

As you might know, I really gained confidence in my own work as I worked on my journal quilts. So, perhaps you might like to join in on the Little Gem project. The one big attraction is that you can make them much more quickly because of the size...they also don't take so much fabric! It is a good use for offcuts of wadding.

I have yet to make one, but it is on the To Do list. I may also donate some of the ones from my 2005 series. I don't want to break up the Tudors. They are going to be a fabric book one day.
So what do you think about donating this one? Do you think anyone would be happy to win it in the tombola?

So, go check out Margaret's blog, and while you are there, have a think about making a Little Gem...or at least come with a plan to get one at the Festival of Quilts at Birmingham in August!

Friday 19 June 2009

Book Cover - development2

Some time back, I showed you a book cover I was trying to develop for making for the Crafts @the Library workshops. The challenge was to develop something that could be made with hand stitching and decoration that would be easy enough to do in the 2 hour period.

I was getting a bit bogged down because there are several different sizes of library books one can take out. I will have to make a bit of a kit...at least for the fabric part of the cover, since I will have to put fusible interfacing on here at home. Not knowing how many will be there and what size book they might be likely to choose was a bit too much. This is also compounded by the fact that this week is Arts Week in Birch Hill, Great Hollands and Jennet's Park here in Bracknell. Our Crafts @the Library sessions next week have been advertised in the leaflets that have been displayed round the town. So, although we have our regulars, the numbers are even more unpredicatable for next week.

Today, I got the final version done and was trying to work out sizes for the others when Hilary, the community police officer stopped by! She was really trying to connect with my husband for a community event. However, we had spoken several times before and she came to one of the craft sessions at the library. It was just the right timing. You know how sometimes you have to talk to someone about what you are doing so you find out yourself? So, Hilary came into the studio and between the 2 of us, I realised it would be much better to get some inexpensive notebooks and make one pattern for all. I could give a hand out about how to measure up for other book sizes, should anyone want to make one.

So, here we are. I popped into town to get some inexpensive notebooks.The workshops are only £2 per person, so I couldn't spend too much. I didn't find it in my usually discount shop, but actually in Rymans...they had some for around 99p, but 3 for the price of 2! That's good!!
The bigger version is covering a diary I had in past years, and the small one is covering a mid-year diary I picked up for college. It is the same size as one of the new little notebooks. I used some fabric adhesive I had got for a class at the Houston quilt show, but hadn't used. If the students want to stitch round the appliques at home, they can do that.
It all works well, and now all I have to do is cut and overlock fabric for book cover kits!
If you are in Bracknell on Tues. the 23rd, come along to the Crafts @the Library workshop at Birch Hill Library from 2-4 pm. Or come to Great Hollands Library from 2-4 pm on Wed. the 24th! I'd love to see you.

Thursday 18 June 2009

Painted Papers - swap

Some time ago I showed you the painted papers I did for a swap. This week the papers from the other ladies came. They are quite exciting. Somehow, when I read the guidelines, I thought you could choose from doodle or stamping. After I had done mine, then they were all calling them doodle papers. So, I have plenty of wonderful papers with doodles...and they have a samples of my stamped/stenciled papers! Oh well, if they use them to make a book, they will have some pages that they can do more doodles on!

Here they are spread out. And it is double wonderful, since they are all double sided! Now to get time to actually make something with them!

Wednesday 17 June 2009

Bits and Pieces Skirt finished!

A while back I posted about a skirt I was making using the piece I chopped off a jeans skirt. I used that section as a yoke and made darts round to bring it into my waist size. Then I added a length of flowery cotton print. I used inverted pleats at regular intervals when I attached the length to the yoke.
I found some buttons that would give the large button look that is currently popular, but as I mentioned, they were kind of strange because they had slots in the centre rather than holes. I thought about attaching them with beads, but I wasn't sure they would be secure.
So, I asked around on some sewing lists. Some of the ideas that appealed was to put another button on top and sew through. As I got thinking about it, I thought I might try some of the tiny buttons I have been using for other things. Well, it was just the right look. I decided to alternate blue and purple to go with the print. (Instead of waiting to the weekend to buy more blue ones...I didn't have quite enough.)
I really like the end result! I am not too sure it is a style that suits me wonderfully, but it will make a change for a summer skirt now and again.


What pleases me the most is that I used up all the fabric from the skirt my sis gave me. The other fabric was from a large amount of cotton prints a friend gave me. The buttons were in a large job lot I got for a fiver from an internet haberdashery going out of business some years ago. And the little buttons were part of what I had picked up because I knew I would find uses for them in updating clothing! Nearly free really !

Tuesday 16 June 2009

Inspiration Tuesday

Recently jkc left a comment about close shots. I am no photography expert. I don't even know all the right terminology! I just take photos! To get closeups, I push the button on my digital camera that has a flower. I also have it on the setting with the person, as opposed to mountain or automatic.

Then I take several photos...I have learned that I am not very steady and that digital cameras really need you to wait a few seconds before pulling away. When I upload the photos from the camera, I open them to see which is the clearest first! Then I start to crop out extraneous background. Sometimes for photos like these, on the settings mentioned above, I then crop to the area I want to focus on. Because the photo size is quite large, cropping works in a similar way to zooming in.
To put them on the blog, I resize them to be 30% smaller. This means they are taking up so much of any allotted space. (I wrote some other reasons as a comment on this post.) Sometimes, I resize to 50% if I have already cropped alot. Or 20% if they still seem too big.


For these photos, I wanted to look at the ageing part of the rose. I took the photo on the settings I mentioned at the top of this post. This would be good for inspiration, but I wanted to go even closer so I don't get distracted by what is around.
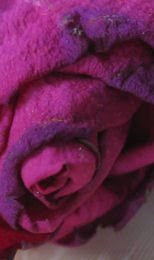
So, I cropped so that I am only looking at the rose itself. In this photo, I start seeing things I can't see in the first photo...or without getting my reading/sewing glasses out! The curving lines and overlapping shapes start to intrigue my design sensibilities. But I really wanted the inspiration photo to be about the decay. So, I cropped even further. And now I am seeing things about the texture and the colour changes at the end of the petals as well as the shadows. If I decided to explore the shadows further, I would turn the photo upside down. If I wanted to look at the interesting folds at the tip of the rose, I would crop even further.

What sort of inspiration could you get from some of your photos?

Monday 15 June 2009

In print - interview

About a month ago I had an email from Leigh Mencarini at Reading Evening Post. Someone on her staff had seen my blog and told her about it. So, she asked if she could do an interview! She was interested in the concept of Refashion, Recycle, especially in the current economic climate. So, she rang me up the next day and we chatted a bit about my background in sewing.

We also talked about the ideas behind walking into a charity shop with the mind set to look for things to change to suit your style. I told her you have to think about it like fabric on a hanger...so, for instance, even if it is not your size or is a man's shirt or whatever, the fabric might be the right thing. We talked about taking features from current fashion and adapting things to suit your age, shape, and especially your own character.

Leigh wanted a few photos of the jeans skirts I had changed, so I sent them off...And volia! Here is the article! It actually came out in their weekend paper Get Reading on the 5th June. There was to be an online link, but there have been changes and it isn't up yet. Since I had all the interesting work from workshops last week, I thought it wouldn't hurt to wait to show you the article. NOTE: the article is up now. Follow this link. GetReading The photos from the hard copy aren't up there, but you can get an idea below. (PS - I have actually lost about a stone in weight since the photo online!)

I was very pleased at how well written the article was. Very true to what I actually said (which was a worry, as sometimes papers twist things). But also Leigh seemed to value the concept and lend credance to the ideas I gave as much as she does when she quotes famous designers or reports on London fashion week. Thanks, Leigh!
So, start thinking. What could you be remaking, refashioning, "upcycling", or whatever you call it? Perhaps you could comment or give a link to something you have done.

Sunday 14 June 2009

Arts Week Exhibition...redraw for give away

Yesterday was the Arts Exhibition for the Reading Arts Week for New Directions community college. The Fabric Painting taster session gained alot of interest, but only 2 ladies stopped long enough to do it. Above is a sample I made while showing some of the techniques. Basically, it is a painted doodle.

There were a lot of other things going on, including a group of ladies (from the knitting course taught by my friend Gabrielle) who were part of an effort to knit a banner for the college! In another room, there were taster sessions on Machine Embroidery and Flower corsage, etc. I hope we have been able to show quite a few people that they should further their learning in some way next year!

Here are the pieces made by the learners who stopped by.

Gillian
I was really pleased that Gillian stepped outside the box and used a combination of the designs I offered to create a unique graphic design of her own.

Sirini
Sirini used techniques she has learned on other painting courses. The results are stunning.

The college had also asked for submissions of artwork to be made up into postcards which would be sold in benefit of the Reading Mayor's Charity. I really didn't have time to submit new photos, so suggested that the organisers look at my website. They liked 2 of my pieces, so I sent the photos to them. There were 350 entries and the public voted for favourites. Suprisingly enough, both of my pieces were chosen.

"My Tears in Your Bottle""My Tears in Your Bottle" is a piece which has exhibited several places and "Mimsy Borogroves and Co" is one I was never very happy with, although I do feel I achieved what I set out to do. The postcard actually makes it look very good!! Both of the pieces are in private collections. Click on the titles to read a bit more about the background to the work.

"Mimsy Borogroves and Co"

So, I have picked up a few of the postcards to keep and to pass on to their owners!

GIVE AWAY UPDATE: Due to the fact that two of the winners of the give away did not contact me with addresses, I have redrawn.

The NEW winners are Ferret and Lorchen. If you get back to me with your snail mail addy, I will send off your design.

Saturday 13 June 2009

Featured Blog

I have mentioned the Blog Wardrobe Refashion several times, so today I thought it would be good to introduce it properly.

Wardrobe Refashion is run by Niki in Australia. It is a place where people are encouraged and inspired to refashion, remake, recycle or make clothing from scratch.

As the website says...Wardrobe Refashion is a community which has had an online presence since early 2006. Based in Melbourne, Australia, owner Nichola Prested started up the site after deciding to quit buying new manufactured clothing in a bid to do her part for the planet, save money and improve her sewing skills. ......Read more about it here.

Members of the blog take this pledge:I __________________ pledge that I shall abstain from the purchase of "new" manufactured items of clothing, for the period of 2 / 4 / 6 months. I pledge that i shall refashion, renovate, recycle preloved items for myself with my own hands in fabric, yarn or other medium for the term of my contract. I pledge that I will share the love and post a photo of my refashioned, renovated, recycled, crafted or created item of clothing on the Wardrobe Refashion blog, so that others may share the joy that thy thriftiness brings! Signed__________________.


The rules of Wardrobe Refashion are:

1.No buying new! (handmade is excepted; So this allows for Etsy purchases etc!!) All clothing must be Recycled, Renovated, Preloved or Thrifted, or Handmade only for the term. Employment related and special needs clothing (ie sports, school), shoes and undies are excepted from the rules, although you are encouraged to have a go at making these.

2.In extreme circumstances, maybe a special event, or the worlds greatest and most amazing never to be repeated sale that you simply can not pass up, you may use the Get out of Refashionista Jail Free card. You are able to use this card once during the 2 month part of your contract; ie 1 for 2 months, 2 for 4 months etc. Of course you need to fess up on the blog and display the button!

3.You must post on the blog at least once a week to let the community know what you've been up to. This will not only give you brag points, but inspire and encourage others! Of course you need to display the button on your blog and have copied the pledge in at least one post, and provide a link to your pledge under the button.

4.You need to be honest and admit when you've fallen off the Refashionista Wagon! Go directly to Refashionista Jail, do not pass GO and do not collect $200! Apply for parole once there.


As you know, this idea has become something I really enjoy. With teaching, I am not doing as much of it as I like, but I have always like to see what I can make from something else.


If this idea appeals to you, go on over to the blog. The next round starts the 1st July. Sign up starts this coming Monday, 15th JUNE . You can sign for 2 months to start with if you want to dip your toe in the water. Or you can hang out reading and getting ideas for a while and perhaps try out a few things and sign up at a later date.
Here is a photo of something I reworked for a colleague several years ago. She'd had the suede jacket dry cleaned, and it sort of ate a large hole under one of the buttons. I reclaimed suede from inside the pocket, cut little hawthorn leaves from it and sewed them under all the buttons. Covering the hole, and making it fit. Then, with the jacket buttoned, I also made more leaves, including some from dark brown suede I had purchased previously. I put some down the area where the button holes were and also a few near the neck edge opening.

The result? She loved it...especially as now she had a designer jacket!

Friday 12 June 2009

Give Away and Courses for next year

Give Away: I sent off the first give away today. Summerset decided to choose the design with orange on it. (Centre one in the group.) I will be interested to see how she is able to use it.

I have not heard from Debbie or Hippopip with their address so I can send the other designs. If I don't hear by Sunday I will draw 2 more names from the original list. If you can not find my email, click on my profile and then click on the email link. If that still doesn't work, leave a comment on today's post and I will see how I can get back to you.

Yesterday I had a great time visiting the Fashion Students to sign off some design work. Here is a small selection from Barbara's exploration of Flowers, concentrating on Sunflowers. Good Work Barbara! Looking forward to seeing how you develop the rest of the ideas.

Tomorrow I am involved in the Reading Arts Week Exhibition. I will be doing a taster session on painted fabric designs in the morning. Stop by and say hello. If you are early enough, you may get to have a go! If you can't get there in the morning, come by anyway and have a look at the work the students from the various courses have been doing both throughout the Arts Week, but also throughout the year.

Today I am filling out paperwork for courses I am going to teach next year. The new course guide is out, and should be online soon. If you live in this area and might be interested in learning in a Community college, New Directions in Reading, Berkshire is a great place to learn. There are loads of course ideas.
At this point it looks like I will be teaching:
Experimental Textile Techniques - 10 weeks starting Monday, 5 Oct, 2009 - 10:00 - 12:00
Designer Cushions - 10 weeks starting Tuesday, 22 Sept, 2009 - 19:30 - 21:30 pm


There will also be a series about making simple dressing up costumes for children.
Fancy Dress for Kids - Celebrations - 5 weeks starting 7 Oct, 2009 - 10:00 - 12:00
Fancy Dress for Kids - History Costumes - 5 weeks starting 18 Nov, 2009 - 10:00 - 12:00
Fancy Dress for Kids - Story book Characters - 5 weeks starting 6 Jan, 2010 - 10:00 - 12:00

Create a Christmas Stocking - one day session 14 Nov, 2009 - 10:15 - 16:45

Contact New Directions on 0845 842 0012. You can simply email your enquires to info@newdirectionsreading.co.uk


There are possibilities of other courses I will be involved with, including some City and Guilds, so watch this space!

Thursday 11 June 2009

Funky Wooden Magnets

One of yesterday's workshops was a session for young carers. Here is a sample of the work from the children who came to paint wooden magnets. They all had great fun. A bit messy, a bit fraught at times, but they all enjoyed the experience. One boy rang his mum while we were working. "Mum? Guess what I'm doing? Well, I'm not going to tell you; but don't look at the fridge when I come home... Bye"

I love it!


I stopped into the fashion class today to sign off some work in logbooks for the Design Principles course.
One of the students had been in the Fusible Appliqué workshop, so she brought in her piece today. She had carried on at home by going round the pieces with zigzag stitch. This was really good, as I had given the idea for a suggestion, but you never know if anyone will follow through.

Some of the other ladies had been in the tie dye class. They brought their dyed pieces all nicely batched and washed out, too. They looked really good. I forgot to get photos, but we are having an exhibit on Saturday, so I think the work will be there then.

It was great to see the positive feedback after the sessions.

Wednesday 10 June 2009

Fusible Appliqué Pictures - Students Work

After a bit of a funny start finding irons and ironing boards, here are some of the designs developed by the students on the Fusible Appliqué workshop yesterday. This was basically a taster session introducing the students to the idea of fusible appliqué. They can work on enhancing the design with stitch at home.


I know the names of the last 2 students, but have to check the spelling!

I was quite excited by the variations of my designs developed by the students. We only had 1 1/2 hours, so I had to limit the possibilities. But even with a limited choice of design, the students did really well at making them their own! I love it! I really like to encourage independant thinking.

Tuesday 9 June 2009

Inspiration Tuesday

Close up of creamy rhododendrons...love the pale pink on the opening bud.

What if question...Do you think elves could use stamens for pins?

Monday 8 June 2009

Tie Dye Workshop day

Just a little idea of the fun we had in the Tie Dye Workshop today. The students were lovely. Some of them plan to be at the Fusible Applique workshop tomorrow!

Very busy day, so off to bed now for an even busier one tomorrow.

Sunday 7 June 2009

And the winners are...

I have done the draw for the winners to the give away from the 200th post on last Sunday. My husband selected the winners...who are hippopip, Summerset, and Debbie M.


Congratulations!!!


If you will email your snail mail addy, I will send off one of the designs. It might be possible to give a preference, so if you have one, let me know and I will see how it works out. If not, I will do a draw with these to see who gets what!


Thanks to everyone for joining in!